Category Archives: viewpoint

The Gatherers Of Light

Voigtlander Nokton and Super Nokton; Long Term Real World Review

A look at a pair of the latest additions to a most unique line-up of lenses, designed for m43 cameras. Read through to find a 15% discount on the full range of Voigtlander m43 Nokton and Super Nokton lenses.

Voigtlander 29mm f0.8 MFT Super Nokton Lens

Voigtlander 29mm f0.8 Super Nokton (f0.8 equivalent 58mm field of view) on camera and Voigtlander 60mm f0.95 MFT Nokton (f0.95, with an equivalent 120mm field of view). Pictured on my Lumix G9 camera. London, UK. Photo: Edmond Terakopian

This astonishing f0.8 aperture’d lens, with an equivalent 58mm field of view on 35mm full-frame format, is in a class of its own. Ground Aspherical elements and a 12 aperture blade design mean that its rendering is simply as spectacular as its light gathering. It focuses down to a very impressive 0.37m and measures 88.9mm x 72.3mm, coming in at 703g.

Voigtlander 60mm f0.95 MFT Nokton Lens

Voigtlander 60mm f0.95 MFT Nokton (f0.95, with an equivalent 120mm field of view) with my Lumix G9 camera. London, UK. Photo: Edmond Terakopian

A 120mm equivalent at f0.95 makes for a very special portrait lens. Its close focus of 0.34m though, brings it into close-up photography territory, making for a very versatile lens. Measuring in at 82.5 x 87.7mm and weighing 860g, this is the chunkier of the newest two Noktons. 

The pair make for an extremely impressive set and the addition of a Voigtlander 10.5mm f0.95 MFT Nokton or Voigtlander 17.5mm f0.95 MFT Nokton lens will make for a perfect three lens outfit, for photographers or film makers, with a uniform rendering, colour, feel and of course, unique light gathering ability.

Discoveries Of The Super Fast F No.

I’ve been using fast aperture lenses for most of my career (almost 33 years at the time of writing). I was the first amongst my colleagues, on my first two newspapers in the 1980s and early 90s, who had an f1.2 lens, in the form of a Canon 55mm f1.2L FD lens. This was soon to be joined by the phenomenal Canon 85mm f1.2L FD lens. In those days of film, the most common film a photojournalist had was 400 ISO, so those fast apertures allowed us to work in hugely varying light conditions.

For me, fast lenses have always been about their light gathering ability and not ‘bokeh’.

I later went on to get AF versions of these lenses in my Canon EOS days. Many years later, when the Leica M9 came along, I saw what the recently released Leica Noctilux ASPH could do. So, after some saving, an insurance cheque from when a security guard dropped a bag full of camera gear and broke most of it and selling off of less used equipment, I managed to get a Leica 50mm f0.95 Noctilux ASPH. An aperture I’d never ever dreamed of and one which opened many possibilities.

Lumix G9 and Voigtlander 29mm F0.8 MFT Super Nokton Lens. Angelika Ghazaryan, a descendant of Genocide Survivors, at the 106th Commemoration of the Armenian Genocide of April 24th, 1915. Members of the British Armenian community gather at the remembrance service for the 1.5 Million Armenians massacred by the Ottoman Empire. US President Joe Biden has become the first US president to issue a statement formally describing the 1915 massacre of Armenians as a genocide by the Ottoman Empire (modern day Turkey) on the day that Armenian communities around the world marked the killing of 1.5 million Armenians. St Yeghiche Armenian Church, London, UK. April 25, 2021. Photo: Edmond Terakopian

My philosophical approach to lens choice has always remained the same; standard lenses, later joined by zoom lenses as the quality increased, married to at least one super fast aperture lens. This approach makes for an extremely versatile outfit.

Years later, I started shooting what began as a personal project on opera, which soon turned into a major 10 month project with an exhibition (seen by over 400,000 people) and a book, supported by Olympus. I was an Olympus Visionary at the time and was shooting with OM-D E-M1 and E-M5 MkII cameras. When working backstage, I quickly realised that the f1.7 M.Zuiko lenses weren’t fast enough. My Leica M9 and 50mm Noctilux weren’t usable either, as I simply couldn’t see enough in the dark to allow me to manually focus the optical rangefinder. The Olympus mirrorless with its EVF was allowing me to see in the dark, almost like a soldier’s night vision, but the available lenses just weren’t usable as the light levels were so low. I started looking for a speedy solution.

I recalled Voigtlander has a 25mm f0.95 Nokton and when I looked deeper into this, realised that the range had been expanded. A quick phone call to Hardy at Robert White Photographic, was followed by me ordering a Voigtlander 17.5mm (35mm equivalent) and 25mm (50mm equivalent). These two f0.95 lenses allowed me to create work impossible to shoot otherwise. Having these f0.95 apertures was truly a revelation. To give an idea of the lighting conditions, I’d often be shooting at 5000 ISO, 1/20th of a second at f0.95. The marriage of fast aperture and built in body stabiliser allowed me to work unhindered by the less than favourable conditions. The slightly deeper depth of field on m43, also aided me to get my subjects sharply in focus. Some of these pictures were printed at over A0 in size, approaching around 1.5m in length for the exhibition.
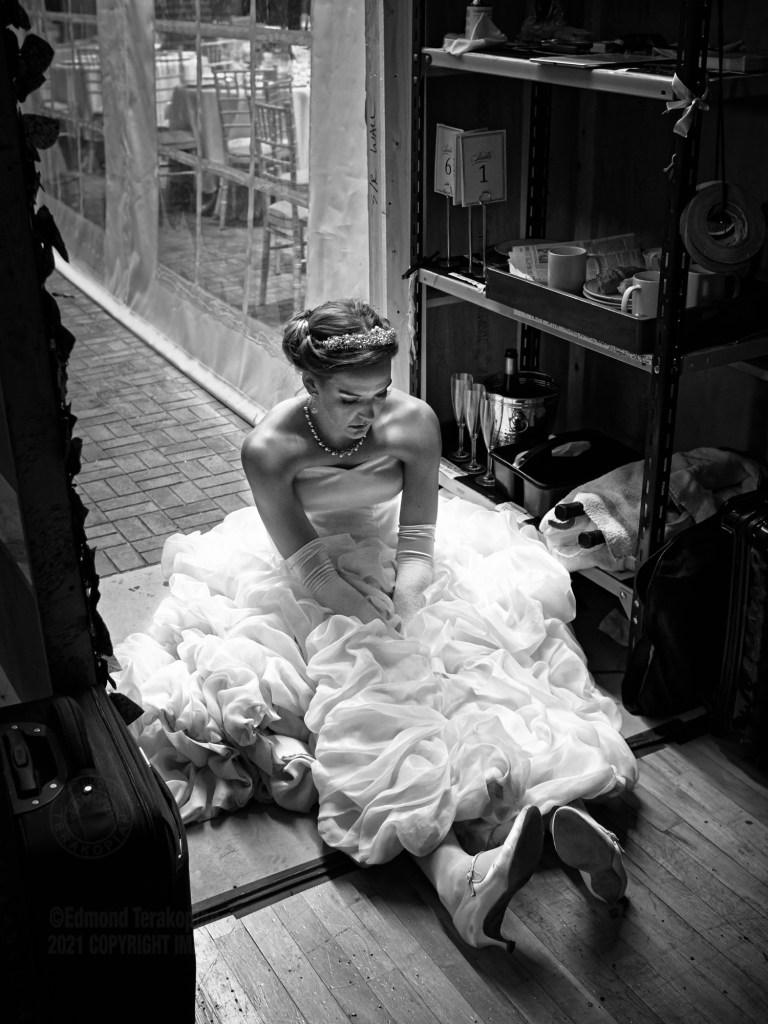
Olympus OM-D E-M5 MkII and Voigtlander 17.5mm f0.95 MFT Nokton Lens. Ida Ränzlöv, singing the part of Arminda, Anchise’s niece, waits backstage for her cue. Mozart’s La finta giardiniera. Dress rehearsal. Royal College of Music Opera School, Prince Consort Road, London. November 25, 2016. Photo: Edmond Terakopian

Later on, on a different production, I decided to add the Voigtlander 10.5mm f0.95 Nokton (21mm equivalent) to my setup. These three Noktons have stayed with me since I first got them in 2015, through to my transition to Lumix.

To see some of my work using these Noktons, either visit my Instagram @terakopian or look at the backstage, low light work in my reportage on the opera, Albert Herring on my SmugMug website: https://terakopian.smugmug.com/Albert-Herring-Opera 

To help illustrate the light gathering aspect, imagine this as a shooting scenario: You’re shooting a portrait in a dimply lit church, trying to craft a beautiful image using the available daylight, gently flowing through the windows. At a very reasonable 400 ISO, you choose to shoot at 1/125th shutter speed, to ensure no movement from you or the subject. With a Nokton, you’re at f0.95, which allows these settings. If you were to shoot with your pro spec zoom lens at f2.8, you would have to ramp the ISO up to a less acceptable 3200 ISO. For me, this ability to shoot with available light is far more of a priority, than bokeh hunting, which of course the Voigtlander Nokton and Super Nokton will give you, by the bucket load. The ability to isolate the subject, is there, in a very unique and aesthetically pleasing way. 
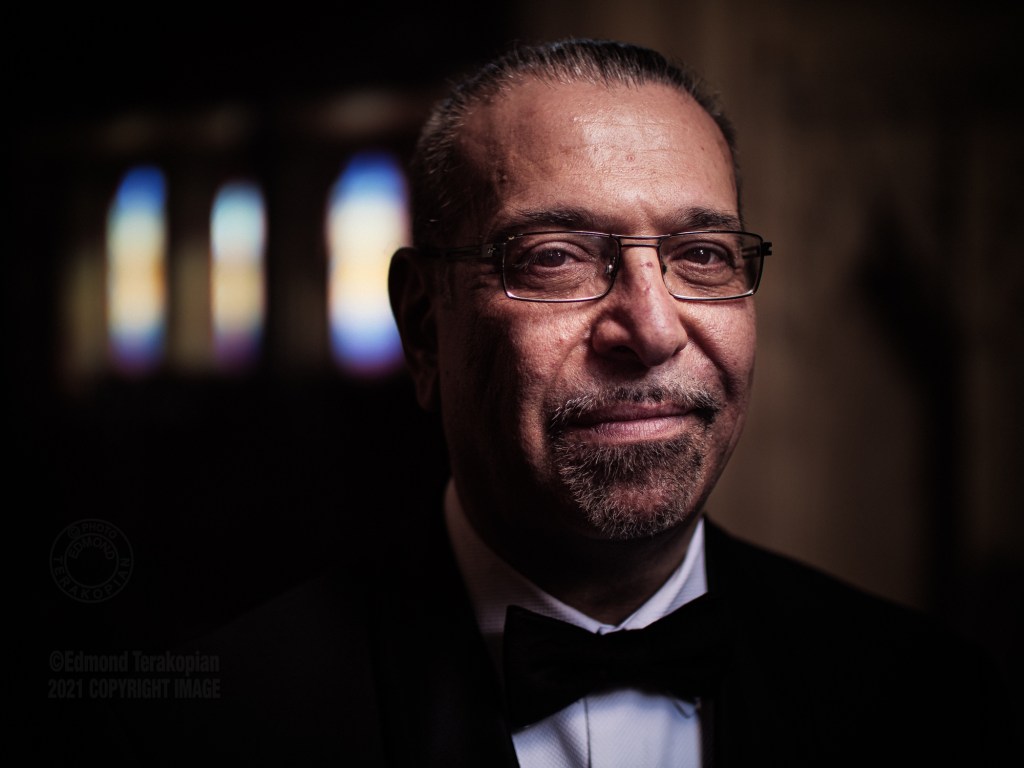
Lumix G9 and Voigtlander 29mm F0.8 MFT Super Nokton Lens. A portrait of opera singer Aris Nadirian. London, UK. Photo: Edmond Terakopian

The Fast F No. Flip Side

These are all specialist lenses and when wide open, they’re not clinically pin sharp when shooting a lens chart, specifically as you start to edge further out from the centre, the sharpness drops somewhat. Even a Leica Noctilux ASPH costing over £8000 struggles with this. Physics is physics and any lens that reaches the dizzying apertures of zero point something, has to make a compromise or two. I only raise this as I’ve occasionally read criticism of all these mega aperture lenses, where the social media poster clearly doesn’t understand that these are specific tools for ultra low light work. Of course, when you stop down to the f5.6 through to f9.0 window, the lenses will sharpen up dramatically, including towards the edges, rendering ‘perfect’ clinical results. For me though, an image with soul wins over a clinically sharp picture of a boring, static object. Photography is about emotion and thought, and these lenses give us the tools to create such work, in conditions often out of bounds.
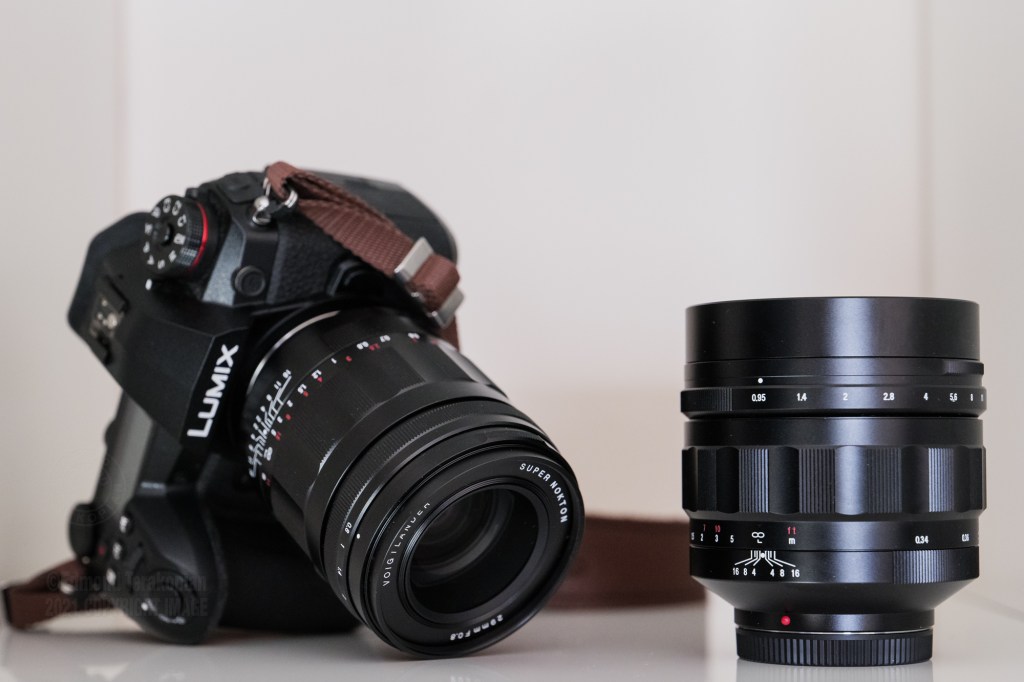
Voigtlander 29mm f0.8 SUPER NOKTON (f0.8 equivalent 58mm field of view) on camera and Voigtlander 60mm f0.95 MFT Nokton (f0.95, with an equivalent 120mm field of view). Pictured with my Lumix G9 camera. London, UK. Photo: Edmond Terakopian

These aren’t general purpose lenses, they are however masters in low light and creative photography. They allow you to work in conditions that are dreamt of and rarely realised with regular prime lenses or zooms. Just to put your mind at ease when I write they’re not clinically pin sharp, I’m more than happy to put my reputation on the line and produce not only my own personal work with these nocturnal creatures, but shoot commissioned assignments too. They are that good. Just not as good when shooting charts on a wall, pixel peeping the chart and comparing them to standard lenses, which don’t have the f zero point something magic.

It’s about keeping in mind that these are specialist tools, which means that I use my Noktons for specific work, that’s where they shine. For fast street photography during the day, I’d definitely choose an AF lens. However, for the same genre at night, when trying to work in the most challenging of situations, then these lenses are the perfect choice and will produce magic. For observed moments in a pub, at a wedding, by the canals in Venice, or a portrait of a loved one, choosing either of these lenses will produce pictures that you will treasure. The close focus also adds the ability of still life closeups, of anything from flowers to objects. Shoot these wide open to create something extremely unique, or stop them down for a more traditional look.
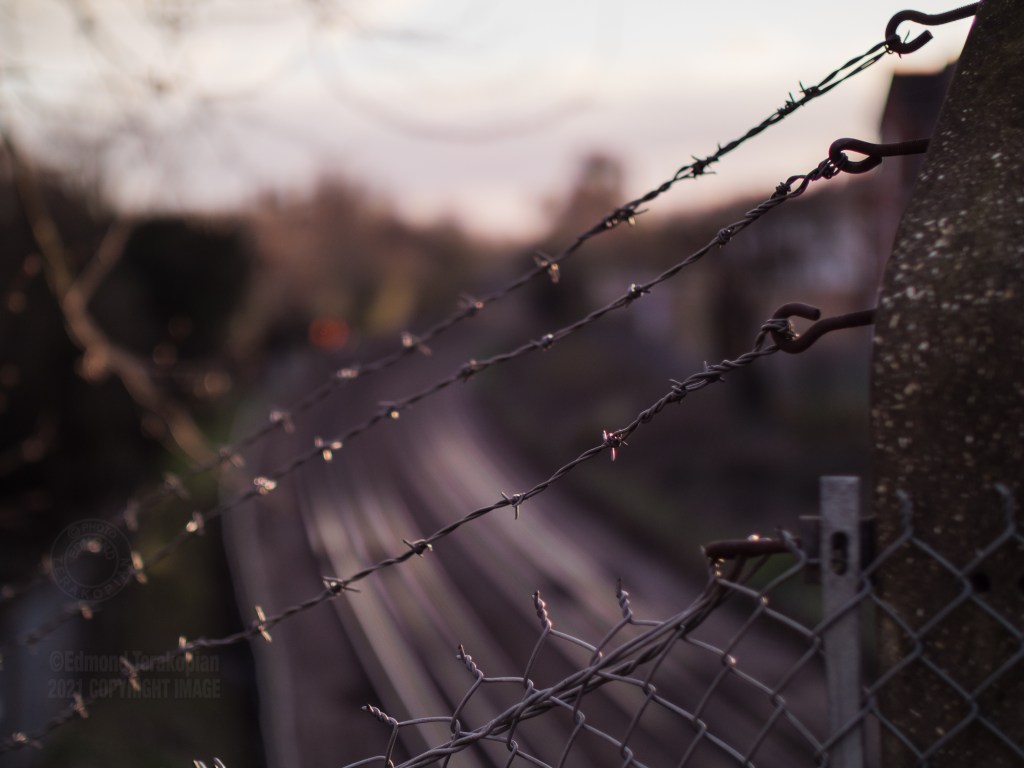
Lumix G9 and Voigtlander 29mm F0.8 MFT Super Nokton Lens. Barbed wire and fencing nearby London Underground rail tracks. Ealing, London, UK. Photo: Edmond Terakopian

This magic takes a little bit of work though and you need to raise your skill level. Once you do though, imagery that wasn’t recordable, begins to write to your memory card. Put in the time it takes to master manual focusing, learning how the focus ring behaves, develop a little muscle memory, use focus peaking and punching in to magnify the focus point to check critical focus, and these lenses will make you smile. You start to produce results from environments you simply wouldn’t have previously been able to really work in. One other tip is to focus wide open, which allows you to be absolutely critical when focusing (it also gives focus peaking a razor’s edge of area to highlight, adding to accuracy) and then if needed, stop down to shoot. Naturally the subject dictates how to approach it, so with faster shooting scenarios, one can focus stopped down as well.

My bag of three Noktons is now a bag of four Noktons and one stellar, Super Nokton. These five lenses are a crucial tool of how I work. I’d definitely recommend you check them out. 
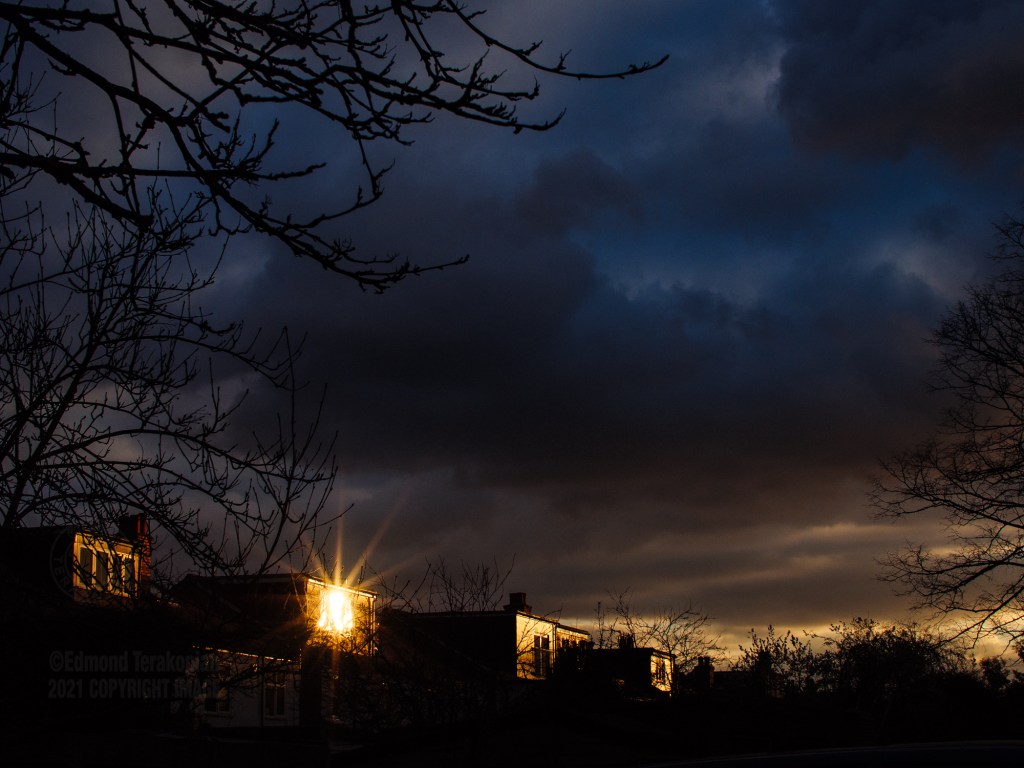
Lumix G9 and Voigtlander 29mm F0.8 MFT Super Nokton Lens. Sunset reflections during a COVID 19 Lockdown permitted exercise walk. Ealing, London, UK. Photo: Edmond Terakopian

Tonal Range

My years of shooting with my three Voigtlander Noktons showed me that these lenses have tremendous tonal range; from highlight detail, with a lovely information rich gradation, all the way to the deepest shadow areas. This provides a raw file with all the details you need, ready to be processed to produce a vibrant colour or the lushest of monochrome images. I’m thrilled to share that these new additions exhibit the same rich, full tonal range. Stop them down a little and they become pin sharp too, perfect for detail rich landscapes or urban cityscapes. 

Lumix G9 and Voigtlander 29mm F0.8 MFT Super Nokton Lens. Daily life on the South Bank, opposite the Houses of Parliament, London, UK. Photo: Edmond Terakopian

Image Processing

When it comes to image processing, m43 cameras have their lens correction info built into their raw profiles. With any non-m43 or non electronic lens, this information is missing. I’m thrilled to say that Adobe’s LightRoom has all this information in the lens correction module. So, just choose Voigtlander and then find the profile for the lens you’ve shot with. In my LightRoom, I’ve actually set up Custom User Presets for each lens, so one click, populates all the settings I need, including some raw processing tweaks.

On the subject of image processing, all the images posted here and in the related Flickr album (see below), were shot in raw and processed in LightRoom. The finishing touches to the colour photographs and the black and white treatment on the monochrome images, were done in Exposure Software’s X6 and X7.

Lumix G9 and Voigtlander 29mm F0.8 MFT Super Nokton Lens. Daily life on the South Bank, opposite the Houses of Parliament, London, UK. Photo: Edmond Terakopian

Construction

Anyone who has used a professional grade manual focus lens from the ‘good old days’ will immediately feel at home. Both of these lenses are phenomenally made. Engineered to perfection; perhaps, over engineered even. To help illustrate this, my three previous Nokton lenses are seven years old at the time of writing; seven years of professional use has left the performing exactly as they did initially and looking practically brand new. These are well made, professional grade lenses. As the DNA is the same with the two newer lenses, I have no doubt that a decade or two on, these lenses will be just as good as they are now.

Voigtlander 60mm f0.95 MFT Nokton (f0.95, with an equivalent 120mm field of view) with my Lumix G9 camera. London, UK. Photo: Edmond Terakopian

The focusing rings are smooth, the aperture rings sure footed. For film makers or those working on film sets as photographers, the aperture ring can be de-clicked at the twist of a ring, resulting in silent operation.

On the video front, the full range of m43 Noktons and the Super Nokton, provides an amazing set of lenses. High end film makers prefer manual focus anyway. The feel, accuracy and look of these lenses, married to a quality ND filter, will produce a wonderful look and feel.

I used to shoot Canon FD (mainly L lenses) and then Nikon AS and AIS lenses in the 90s and both of these Voigtlanders remind me of using those quality lenses with their silky smooth and sure footed handling.

Voigtlander 60mm f0.95 MFT Nokton (f0.95, with an equivalent 120mm field of view). London, UK. Photo: Edmond Terakopian

These solid and metal bodied lenses are heavier than most of their plastic bodied brethren though, so one needs more careful matching to camera body. They balance perfectly and handle beautifully on my Lumix G9 cameras, with or without (which is how I usually have mine) the vertical grip. I wouldn’t really use them on my smaller and grip-less Lumix GX9. I’d definitely recommend the higher end bodies with grips or the middle range bodies with their optional grips. This will make for a more comfortable setup. In my days when shooting with Olympus and my set of three Noktons, the E-M1 balanced perfectly, but the E-M5 MkII definitely needed the grip added for comfortable working, as the built-in grip was just too small. Of course if working with a tripod, or a cage for video work, the handling won’t be an issue. It’s worth keeping in mind that the extra engineering and metal construction makes for much more control on fine tuning the focus, which is crucial when working wide open. 

Other f0.95 Options

At the time of writing, other options for proper f0.95 lenses are from Leica with their Noctilux range and Nikon with their Noct. These options will set the photographer back in the £8000 to £10,000 range. There are a few other options available, but these are gimmick lenses in my opinion and good to play with perhaps, but not to shoot seriously with, in situations when one has to use dependable gear. I definitely wouldn’t use the other options on professional assignments, where as I haven’t hesitated to use my Voigtlander Noktons.
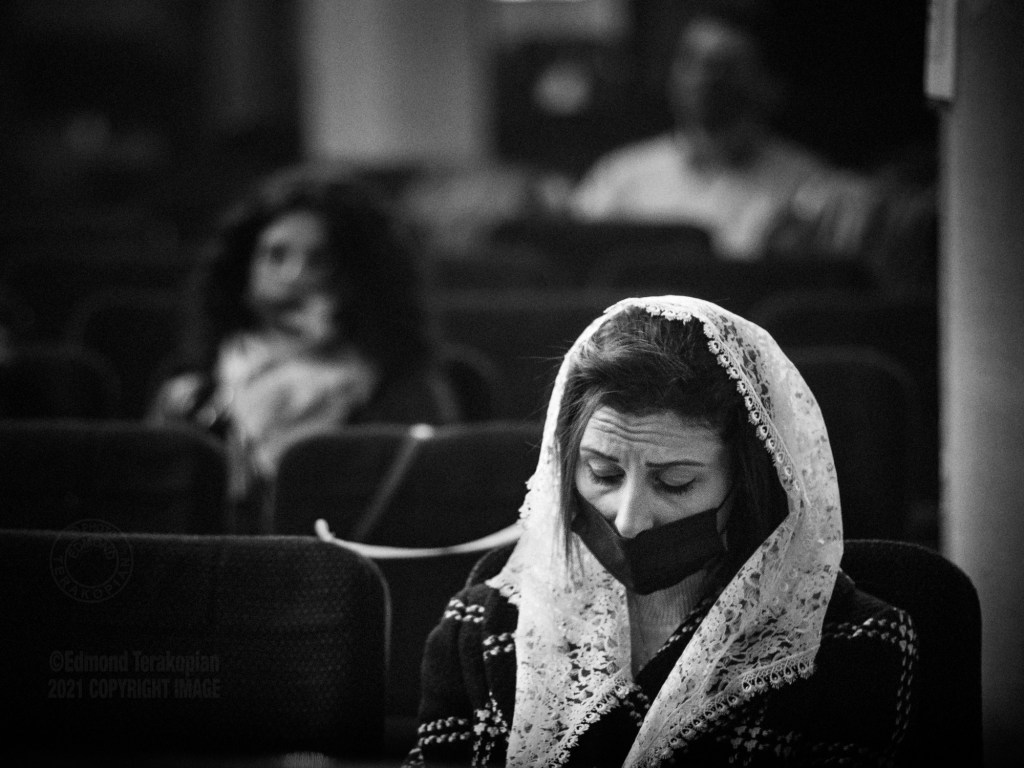
Lumix G9 and Voigtlander 60mm f0.95 MFT Nokton Lens. Joe Biden has become the first US president to issue a statement formally describing the 1915 massacre of Armenians as a genocide by the Ottoman Empire (modern day Turkey) on the day that Armenian communities around the world marked the killing of 1.5 million Armenians. (London, UK) 106th Commemoration of the Armenian Genocide of April 24th. Members of the British Armenian community gather at the remembrance service for the 1.5 Million Armenians massacred by the Ottoman Empire. St Yeghiche Armenian Church, London, UK. April 25, 2021. Photo: Edmond Terakopian

At the time of writing, the Voigtlander 29mm F0.8 MFT Super Nokton comes in at £1,599.00 (inc VAT) and the Voigtlander 60mm f0.95 MFT Nokton at £1,049.00 (inc VAT). Whilst not cheap, nor is their construction, or the results they produce. Given how well they perform, how well they’re made and well my older Nokton lenses have lasted, these are valued appropriately I’d say. These lenses are worth every penny and the Super Nokton is unparalleled in it’s f0.8 aperture.

Lumix G9 and Voigtlander 29mm F0.8 MFT Super Nokton Lens. Joe Biden has become the first US president to issue a statement formally describing the 1915 massacre of Armenians as a genocide by the Ottoman Empire (modern day Turkey) on the day that Armenian communities around the world marked the killing of 1.5 million Armenians. (London, UK) 106th Commemoration of the Armenian Genocide of April 24th. Members of the British Armenian community gather at the remembrance service for the 1.5 Million Armenians massacred by the Ottoman Empire. St Yeghiche Armenian Church, London, UK. April 25, 2021. Photo: Edmond Terakopian

When planning a camera outfit or planning lens purchases, investing in the best lenses you can get, is the wisest move. Sticking a cheaper lens in front of the best sensor, will give an much inferior result to putting a great lens in front of a good sensor. The other aspect, is that lenses far outlast camera bodies. So invest wisely and you won’t need to change the lens anywhere near as often as you would a body. 

Both of these optics produce phenomenal results, with a look and feel that gives the images a signature and a ‘pop’. For me, a huge part of the attraction for Lumix and Olympus m43 is the Nokton range, as it adds tremendous versatility that no other lens mount on the market has; super fast apertured lenses covering ultra wide angle, to medium telephoto (equivalent of 21mm to 120mm). With the addition of these two optics, the range is now not only complete, but with the Super Nokton, out of this world good. I can’t recommend them highly enough. As I have done, get in touch with Robert White Photographic and check them out. You won’t be disappointed. 

Final Thoughts

Whilst both m43 brands produce exceptional lenses, especially in their Leica DG and M.Zuiko PRO ranges, including faster f1.2 and f1.4 options, there just isn’t the option to go faster. In a sea of images shot with f2.8 zooms, with some stretching for the Lumix, Olympus or Sigma faster lenses, nothing is going to give the look of these Voigtlander lenses. The 60mm Nokton and 29mm Super Nokton, render in a unique way, not only letting you create in lower light, but to make an image which is unique. An image which pops. Bringing almost a three dimensionality to the scene. If you can look at a scene, raise your camera and make a unique photograph, I say, why not?! Creativity is about creating, not mimicking the masses with run of the mill facsimiles.
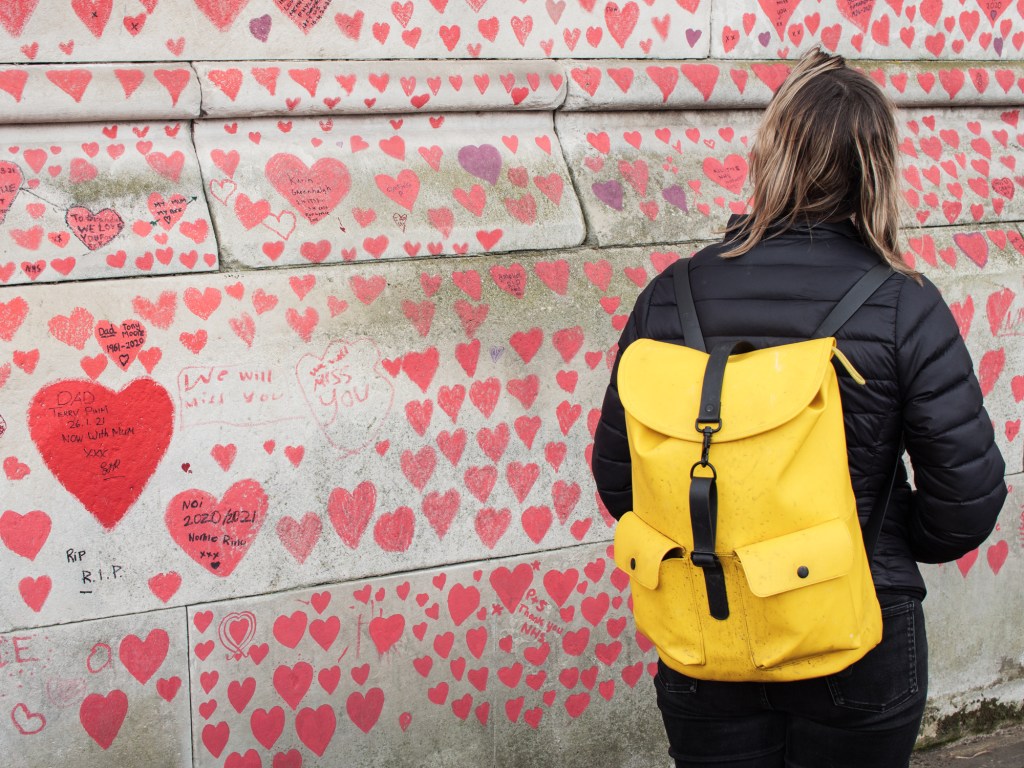
Lumix G9 and Voigtlander 29mm F0.8 MFT Super Nokton Lens. The wall of hearts grows as a memorial to loved ones taken by coronavirus. Each heart representing every one of the UK’s close to 150,000 victims (to date). The memorial is the idea of the Covid-19 Bereaved Families for Justice campaign group, which has called for an inquiry into the Government’s handling of the pandemic. The National COVID Memorial Wall. North Wing, Lambeth Palace Rd, South Bank, London SE1 3FT. Photo: Edmond Terakopian

Aperture Is Aperture

These astonishing lenses are f0.8 for the Super Nokton and f0.95 for the Nokton.

Let’s clear up a misconception though; that of apertures being somehow different in Micro Four Thirds, as its a cropped sensor. I keep seeing misinformation online in forums and groups, so think it crucial to clear this up!

Lumix G9 and Voigtlander 60mm f0.95 MFT Nokton Lens. A portrait of Elvis. London, UK. Photo: Edmond Terakopian

Imagine that you have a 70-200mm f2.8 lens. Its a constant aperture lens, so f2.8 all the way through. So, at 70mm, f2.8 is the same as f2.8 at the 200mm end. Both, given identical lighting conditions, will provide the exact same exposure. So, f2.8 is f2.8.

However, the depth of field on the same lens will differ tremendously from the 70mm to the 200mm end. 70mm will give a wider depth of field, with more being in focus, compared to a shallower depth of field at the 200mm end.

So, it’s in fact depth of field and the rendition of the image in defocused areas, or bokeh, which differs between sensor sizes. So, an f2.8 aperture on a given lens, will render bokeh, or set depth of field differently between m43, APS-C, full frame or medium format etc. The larger the sensor, the shallower the depth of field and the softer the bokeh. As mentioned though, the light gathering ability of that f2.8 aperture remains the same. So, for the physics of light, these f0.8 and f0.95 apertures, have the same astonishing light gathering ability as a full frame camera and lens would….well, if there was an f0.8 option available.

Lumix G9 and Voigtlander 60mm f0.95 MFT Nokton Lens. Geese on the South Bank, opposite the Houses of Parliament, London, UK. Photo: Edmond Terakopian

One last point on the subject of bokeh; many novices will rush to buy the most exotic aperture lens they can afford, wrongly thinking it will improve their photography because its a “bokeh monster” or that it will magically just render bokeh, without the photographer needing to master any basic elements of photographic technique or understanding of photography.

One can achieve beautiful subject isolation and soft background, with a lens set at F5.6 or f8.0, or get everything relatively sharp in the frame with little or no isolation using an f1.4 aperture. Camera to subject distance needs to be close and subject to background, much farther. Keep this in mind. It’s not just setting an aperture, but understanding subject and background distances, for a given aperture, for a given social length.

Given this understanding, then yes, a magical aperture of f0.95 or f0.8 will not only let you work in super low light, but allow you to achieve astonishing subject isolation, with that 3D look and super soft, beautiful bokeh. Given the lens is a good lens; aperture alone won’t produce creamy backgrounds. So dear reader, do get these dream lenses, but also learn about photographic technique and practice too, so you can get the most out of your lenses and even more importantly, get much more joy and satisfaction out of your photography. 

One Last Thought On Bokeh

It’s really disconcerting how may photography enthusiasts are bokeh hunters. There’s a sizeable enough group of people who express more interest in out of focus backgrounds, than they do for the in focus aspect within the photograph; the actual subject. No great photograph in history has ever been about the out of focus background. Whilst these lenses will allow this, crucially, they allow creating photographs and video, in lighting conditions which would make it impossible. They produce a beautiful and unique signature when doing so and can make your subject pop. That is where they shine in my opinion. 

Lumix G9 and Voigtlander 29mm F0.8 MFT Super Nokton Lens. Members of the British Armenian community gather at the remembrance service for the 1.5 Million Armenians massacred by the Ottoman Empire. 106th Commemoration of the Armenian Genocide of April 24th. St Yeghiche Armenian Church, London, UK. April 25, 2021. Photo: Edmond Terakopian

READERS’ DISCOUNT CODE

The fabulous folks at Robert White Photographic and Flaghead Photographic Limited have very generously provided a 15% discount code. The code is multi-use, so you won’t be limited when getting a second or third lens, should you decide super low light photography or subject isolation like never before available on m43 is for you.

The code Terakopian will get you a 15% discount off, from any of the six Voigtlander Micro Four Thirds lenses. Visit Robert White Photographic if you’d like to use this discount. Having shot professionally with five of these lenses for years, I really cannot recommend them highly enough. They open up new avenues of possibility with your camera.

Link To My FLICKR Album

To view the photographs featured and some others, without downsizing or compression, please visit this Flickr Album which accompanies this review.

Lumix G9 and Voigtlander 29mm F0.8 MFT Super Nokton Lens. A Pilot Custom Urushi fountain pen. London, UK. Photo: Edmond Terakopian

The Seam Between Photojournalist and Artistic Photography

As the year comes to a close, I was truly humbled and moved when photography commentator Shira Shavit wrote a piece about my work on her extremely popular LinkedIn.

Opera singer Ida Ränzlöv, singing the part of Arminda, Anchise’s niece, waits backstage for her cue. Mozart’s La finta giardiniera. Dress rehearsal. Royal College of Music Opera School, Prince Consort Road, London. November 25, 2016. Photo: ©OEdmond Terakopian / 2016

Shira chose a backstage photograph of opera singer extraordinaire, Ida Ränzlöv, as a leading image and very kindly wrote the following about my work.

“I usually write about photographers who are not among the living. For photographers who have left a priceless legacy. That influenced me. Who left a mark on me. I have written very little about photographers while they are still alive. But this Is one of the pulse-pounding photographers and I am very attached to his work. A brave connection of a viewer In front of the work of the photographer – It’s a special bond . Edmond Is one of them. The seam between photojournalist and artistic photography – He symbolizes for me. Beyond being a photographer of supreme grace he Is also a wonderful human . Photographers show us the world, through the lenses of their eyes. I have a real and sincere fondness for observing the subject Of the world through the lenses of Edmond’s special eye.”

“Photography as a language, of all visual languages, Is known to be the most intuitive, completely unmediated and speaks directly to the brain. There Is a factor In photography that evokes the almost physiological response of the word / sound – wow. The wow factor – I found In his work.” – Shira Shavit, December 2021.

Friday Photowalk Podcast-Part Two

Photography Daily with Neale James

Joyed to share the second part of a great chat with Neale on the new season of the Friday Photowalk.

Wreath-laying ceremony at the memorial khachkar (a carved Armenian Stone Cross memorial sculpture) took place after a remembrance service and prayer of intercession, to commemorate the 105th anniversary of the Armenian Genocide of April 24th, 1915, when 1.5 Million Armenians were massacred by the Ottoman Empire. A member of the clergy swings a censer (a type of thurible) of incense. The usual wreath laying ceremony at The Cenotaph, attended by hundreds, was cancelled this year due to the COVID 19 lockdown and instead took place on church grounds. St. Yeghiche Armenian Church, Cranley Gardens, South Kensington, London, UK. April 24, 2020. Photo: Edmond Terakopian

You can find the second episode, accompanying links and pictures here: #256 PHOTOWALK: let SOUND add life TO YOUR PICTURES, TERAKOPIAN PT.2 & OTHER STORIES

The new season has a fresh, new approach to podcasting and I hope you can listen throughout. If you’d like to jump straight to my segment, skip forward to 00:54:51 minutes. I’m discussing my passion for photography, street photography, wedding photography, shooting video and a new hobby I started during lockdown which has led to an entirely new genre of photography for me! I would urge you to listen to the entire episode though as it’s very enjoyable and informative.

The marriage of Katharine and Ilicco. London. September, 2016. Photo: Edmond Terakopian
An absolute icon and masterpiece of lasting, timeless design; the Montblanc Meisterstück 149 (Platinum-Coated) Fountain Pen. London, UK. August 01, 2021. Photo: Edmond Terakopian

For Part One, please click HERE.

Friday Photowalk Podcast-Part One

Photography Daily with Neale James

An absolute joy to have another interesting chat with Neale on the new season of the Friday Photowalk.

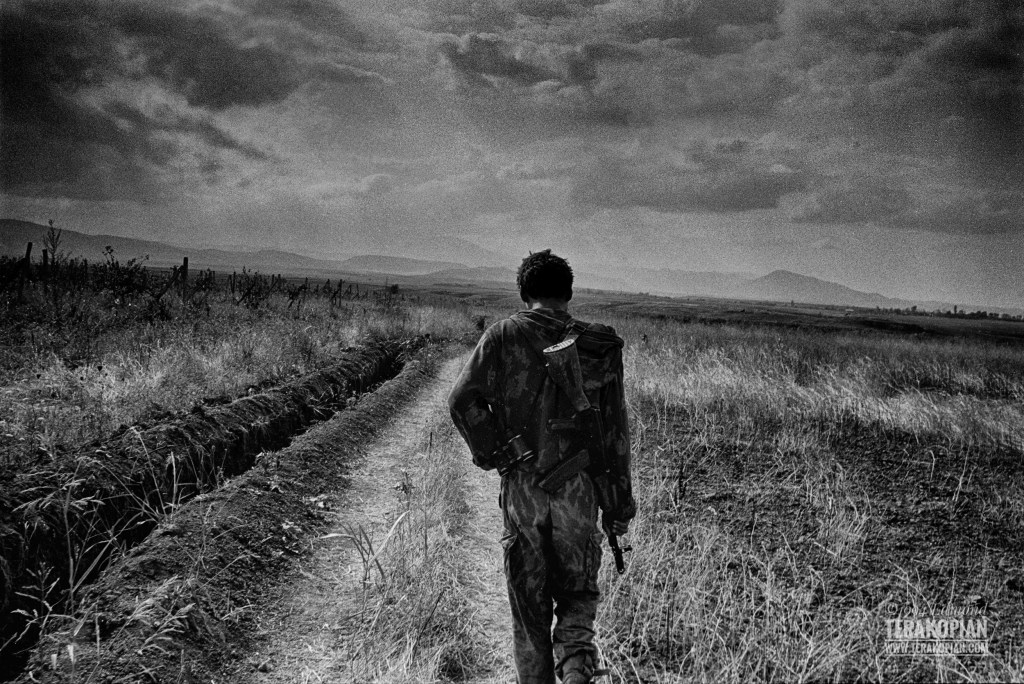
Back To The Front. A soldier makes his way to the front line in Martakert, Artsakh (Karabakh). 1994. Photo: ©Edmond Terakopian

You can find the episode, accompanying links and pictures here: #255 PHOTOWALK: FIND YOUR PHOTO MOJO & EDMOND TERAKOPIAN PT.1

Part 2 will be published the following week and I will make sure to post about it. The entire episode is interesting with a fresh, new approach to podcasting and I hope you can listen throughout. If you’d like to jump straight to my segment, skip forward to 0:45 minutes. I’m discussing our new group exhibition called Unlocked as well as various aspects of being a photojournalist, what photography is for me, social media and also the pandemic. I would urge you to listen to the entire episode though as it’s enjoyable and informative.

A Vigil By Smartphone Lights. Fundraising and Candlelight Vigil. Following miltary action by Azerbaijan with the backing of Turkey from the 27th of September, against the Republic of Artsakh (Nagorno Karabakh) and Armenia, a war has ensued in the region. Armenian communities in the diaspora gather to raise funds with the defence effort and humanatarian crisis in Artsakh and Armenia. Members of the Armenian community in the UK gather for a candle lit vigil (using smartphone lights as a result of health and safety rules) and fund raising event for the Armenia Fund (Himnadram) with the support of the Armenian Apostolic Church in London. St. Yeghiche Armenian Church, South Kensington, London, UK. October 10, 2020. Photo: ©Edmond Terakopian

Pressing A Button Is Not Photography

I went to see Salvador in the cinema, in 1986 or 87.


If you haven’t seen it, it’s about photojournalists covering the civil war in Salvador. Highly recommend you watch it! Also, there’s a spoiler coming up, so if you’re going to see it, stop reading, now and return once you’ve seen the film!!

In the film, the main protagonist is a photojournalist played by James Woods. As he’s trying to leave El Salvador to get back to the States, he’s stopped at a check point and roughed up. He was trying to smuggle out films of the civil war and these ‘soldiers’ find the films and rip out the film from the cassette, ruining the pictures.

As this happens, I jumped out of my seat and screamed out ‘NO’! To say my friends were shocked (all non photographers) and the audience most concerned, would be an understatement. My eyes were filled with tears and my heart was pounding. I had been a hobbyist photographer for around two years and this was roughly two years before I started working as a photojournalist. Having dedicated every penny to buying film and every spare minute to reading about and looking at great photography, already brought a deep association with important, quality work.

As photographers, we have a very deep connection to our work. It’s part of us. Its not a job.

The Less Than Thoughtful Client

I had a client a year or two ago, really trying to low ball some work and massively over play the usage, well above the license agreed and paid for. The response during the ensuing discussions, was “its nothing personal, its just work”!

I’ve had clients, trying to con me into giving away copyright, accept very low pay for it, with the almost definite lies of more work in the future (Which never appears. A cheap or dishonest client never steps up and each time one of us accepts such a deal, it affects everyone else after us and for us, the client will never return. The entire industry takes another step towards ruin). Unprofessionalism and dishonesty, never right themselves. Every time we give in, we encourage and enforce this behaviour as being acceptable.

So the concept of a truly passionate, dedicated creative professional looking at their calling in life, be it photography, film making, music, poetry, writing and so on, being ‘just a job’, goes to show extreme ignorance in understanding what we do, how we think and how we are.

Long term partnerships nurture amazing work, which in turn makes the person booking the creative work look great and retain their client or job. Happy boss / client, happy middle person and happy creative.

The sad fact that more and more, only cutting corners seems to matter, even be a priority and quality of work is no longer an issue for these types of people, means that society’s appreciation of quality is diminishing. Quality and thought can be in a great advert. It can be an Instagram campaign. A Facebook sponsored post. A point of sale poster in a shop. The client pays, the middle person takes the biggest cut, the actual creative making the work, gets cheated.

A few years ago, I had a huge multi-national company trying to get me to work for free, as they felt paying for my vision, creativity, experience, time and skill, would pollute the purity of the work and this brand only wanted to work with truly passionate people who believe in the brand. My response to this person was in the form of a compliment; praising that they seemed extremely passionate and dedicated, so I was certain they must be working for free. Needless to say, this was met with astonished silence.

Just because someone can push a button and accepts being conned, does not make them a pianist, a writer or a photographer. No one who truly cares for their work, will disrespect their own creation and devalue it.

Some Advice For Young Photographers

If you’re new to the world of photography, my first piece of advice is to research and never agree to a fee or license on the spot. Most dishonest clients will try the line that they’re right up against the deadline etc. This is a pressurising technique. Promise of more work as there’s a low budget, is also a trick. When faced with such things, I always promise to do an amazing deal on the fifth booking. This type of client never comes back for a second booking, let alone a fifth, as they are purely out to take advantage.

As for rates and what to charge, there are various licensing calculators, like fotoQuote or the AOP’s online usage calculator. These are complied from prices paid, for similar work and an agreement between clients and photographers. These are industry standard rates. You can use these as a basis to either quote directly from, or to negotiate near to figures. If your skill and work is unique, you can negotiate upwards, for example. There are also several photographer’s groups online, where advice can be garnered before making an agreement.

Copyright. This is yours by law. Its not the client’s. If a client wants a buyout, this can be arranged and negotiated. Never give this away for free. Ever.

Value your work and that of the industry.

Loupedeck CT Review

Five Months Of Working With The Loupedeck CT

Workspace. Ergonomics. Repetitive Strain Injury. Workflow. Efficiency. Speed. Control.

Jargon that gets introduced into any conversation about working on a computer, ranging from moans about things taking too long to physically painful woes. As creatives though, we’re using computers in much more in-depth and involved ways. Photography, video, audio and so on, bring with them much more complex creation software, which moves us away from typing, some mouse usage or simple cut and paste shortcuts, into a myriad of easily confused and forgettable keyboard shortcuts, some involving a fair amount of finger dexterity. Add to this the operating of a cursor applying a brush or a cut on a timeline, and it’s very easy to start doing advanced level yoga with our fingers on a keyboard and mouse or probably even worse, trackpad.

Loupedeck CT at my Apple Mac workstation. London, UK. April 01, 2021. Photo: Edmond Terakopian

Spending hours editing and processing a big assignment, or sometimes weeks editing long term projects, made me realise I had to find a better way of working. Around seven years ago, I bought a Contour Design ShuttlePRO V.2 and programmed it for use in Lightroom. This lived on the left side of my keyboard whilst a Wacom tablet lived on the right hand side. The concept was simple; program often used commands and key strokes into the unit, operate it with my left hand, whilst the right hand operated the Wacom pen. Much more efficient and also ergonomic.

The Shuttle Pro though wasn’t perfect. The keys stopped responding properly after a couple of years and I wanted something more designed for creative use, rather than as an office tool which could be re-purposed. Also, the software left much to be desired. At The Photography Show at the NEC around three years ago, I was walking past the Loupedeck stand and caught a demonstration of the Loupedeck+. At the same time, a colleague walked past, saw me watching the demo and told me he’d been using one for a while and loved it. I was sold. Passed over my credit card and walked away with it under my arm.

With both of these systems, I had to add printed labels onto the keys I had programmed. Otherwise it becomes too much of a head scratcher trying to remember (although given enough time, it does become muscle memory, but for the initial weeks and months, labels are definitely needed). I’d seen various, often gaming targeted, keyboard type devices with small OLED panels which could display labels, but non were suitable for my needs. Then came along another product from a company I had already trust in; the Loupedeck CT. 

The company calls this unit a “precision editing console for creative professionals”, with “endless customisation”. Well, they’re not wrong! Whilst the Loupedeck+, which I’m still very fond of and do recommend, was primarily aimed at LightRoom users, the CT opens up many more applications, with the bonus of having customisable workspaces and pages of programmable keys with icons that show what they each do. No more printed or scribbled labels needed! Plus, having the added ability of having multiple pages, each touch key can take on multiple uses, so an ever changing set of labels on the touch screen, is a tremendous help indeed.  

Before I get into my thoughts and experiences, I decided to make this a long term review, for two reasons. Firstly, the CT is as complex or as simple a product as you wish it to be. The Loupedeck CT software already comes with customisation for a variety of different photography, video, illustration applications as well as the OS itself. So, it’s good to go, straight out the box. Or, you can spend time with it and create your own customisation; from modifying the existing setup with the odd key here or there, to fully making up your own workspaces, buttons and so on, which if you want to do it properly, will take a little bit of time to design efficiently, so it suits you perfectly. The actual software is very user friendly and easy to customise. The second reason for making this a long term review, was a colleague told me he had read a report of build quality issues with the knobs on the Loupedeck CT. This did surprise me as the unit felt very well built and constructed as a premium piece of professional grade hardware. As a result of these points, especially the latter, I decided to use it for a while, in a full on professional environment, before writing up my review. The Loupdeck CT has sat on the left of my keyboard for months, whilst to the right of which is a small, Wacom Intuos Pro tablet (highly recommended). As a side note, these two peripherals work perfectly together and fulfil the same ethos of taking away physical strain and fatigue, whilst adding more precision at the same time. Add a quality twin monitor setup (my choice is Eizo CG monitors with built in calibration) and you’ll have a sweet setup that helps you fly through editing and gives you precision when processing.

Even in Finder, the OS controls make it a very useful tool to have. I have LightRoom and Photoshop programmed on two launch keys. One tap and the software I need starts up. Even something like the Calculator becomes easier to use; tap the Calculator button and the CT itself turns into a calculator keypad. You even get a snazzy analogue clock in the centre of the main control dial. The Launchpad, Siri, a new Finder window or System Preferences are all one button touch away.

Getting back to the customisation aspect, the best piece of advice I can give is to live with the CT as is for a while. Use it extensively and get a feel for how the unit works. Soon, you will organically start to realise what’s missing for your own particular needs. We all have our way of working with the software we use. Our own individual quirks or specific workflow needs. Its this extra time spent, that’s time well spent, as it will not only get you used to the various touchscreen and hardware controls, but will help you mentally map what you would like to customise and add, for your unique workflow needs.

Loupedeck CT at my Apple Mac workstation. London, UK. April 01, 2021. Photo: Edmond Terakopian

If you do a lot of work on location or a lot of travelling, one huge bonus the CT has over the Loupedeck+ is that its size makes it travel friendly. You can even get a travel case for it. A strange addition, until I thought it through, is that it has 8Gb of onboard memory, which just shows up as a removable drive, when the CT is plugged in to your computer. This is perfect for keeping any custom settings backed onto, the driver software, along with any other custom presets you may have for other software, meaning that you could just plug the CT into any machine and have it set up for your custom needs, within minutes. Fully self contained, on location tool.

So, almost five months on, I have sat down to type out my thoughts. To address the second point first, the one of build quality, I haven’t had a single issue with neither the hardware, nor the software. Every dial, button and touchscreen interface has worked flawlessly since I first plugged it in, around the middle of November 2020. In this time frame, I’ve gone through at least 10,000 pictures (assignments, personal shoots, competition edits, putting together talks and presentations, as well as putting together images for my new forthcoming website. Just as my Loupedeck+ never gave me a single issue, the Loupedeck CT has just worked and blended invisibly into the background, letting me work efficiently and without fuss. For me, this is always the mark of a good piece of equipment or software; something that empowers you to work well, without making itself apparent and just fading into the background. I’ve even gone through a major OS change, going from Mac OS Catalina to Mac OS Big Sur on my 2013 Mac Pro, without issue. Incidentally, Windows is also supported, although I’ve not tested the unit on a Windows machine. 

There are two main things the Loupedeck CT allows you to do; work with efficiency and work with much better control over the tools you use within your chosen applications.

The added control comes with having tactile knobs (which have gentle clicks as they are turned) to turn when changing controls such as exposure, contrast, colour temperature and so on. You have so much more fine control on making either small tweaks, or turning the knob at speed and making large changes to the onscreen slider. It allows you to do all of this whilst keeping your cursor where it belongs, on the image itself and not constantly moving in a frenzy between processing controls, brushing and so on. The second huge boost for control is having the main control dial allowing you to change brush size and feathering size, again without needing to move the curser off your photograph and onto the processing modules to the right. This lets you brush on precise masks when working, giving you much more control and also allowing you to do this efficiently and not constantly taking the cursor or your concentration off the area you’re working on. It helps you keep a flow, which is not only much more efficient, but much less irksome and creatively rewarding, during long editing sessions. Creativity should flow, unhindered. 

Customisation

After much procrastination, I realised the company’s own settings for LightRoom Classic, generally suited me just fine. I used the pages in the control set as they were, but with use, started to change out some of the buttons for ones which suited me. On a page like the Presets, I removed all the existing presets and instead added all of my custom raw presets, which were already saved in LightRoom. The Loupedeck software interface is a joy to use and very simple. Just drag and drop. That’s it. The Loupedeck CT is updated live as you make changes, so as soon as you switch to your software, you’ll see the remapping and relabelling has already been done; you’re good to go. Very elegant and very simple. The possibilities are also pretty endless, so if you have extremely specialised needs, you can customise to your heart’s content. 

The Loupedeck software and the first page for Lightroom’s Library, with a few of the buttons swapped out for my needs.
A page with my custom raw presets.

In Use

In use, the hardware gives you the physical buttons, dials and touchscreen buttons, as mentioned. You also have two segments on the screen which label the six smaller dials, so one instantly knows what they are mapped to do. Swiping this same screen, takes us to the next page, which different dial operations and touchscreen buttons.

The CT also has an amazing main dial, in the lower portion of the unit, positioned centrally. This offers super precise control to change values or movement. The genius part though, is that it also has a circular display in its centre, which displays a plethora of functions, depending on what software, module or page one is on. Did I mention this is a touchscreen too?!

As for the touchscreen’s virtual buttons, to keep with the tactile nature of the unit, each press has a haptic feedback alongside a generated sound, so in use, one is assured of having pressed the button.

This is an extremely useful design. If for example when in the Develop module, one press on the touchscreen button ‘Basic Panel Wheel’, brings up on the circular touchscreen, all the processing sliders, in the same order as they appear in LightRoom. You can swipe up or down, from one to the next and if you decide to make a change, you just turn the main dial clockwise or counterclockwise. Then swipe to the next and so on. Elegant, fast, simple and precise, without taking your concentration away from the photograph, rather than having to constantly look to the onscreen slider and move your cursor there to change a value and have your eyes darting back and forth as you change a value and then look to see the change on your picture.

So, as well as cutting down on physical fatigue of hand and digit, it also helps hugely reduce eye strain, as one doesn’t have to constantly keep looking at various panels, sliders and the image itself. Whilst a quick edit now and again won’t result in much fatigue, add a large shoot with several hundred pictures and this fatigue quickly adds up. Now multiply that by a couple of times a week and in no time, you can have either have fatigue and eye strain, or you can choose to just have precisely edited and processed work, done comfortably.

So, is it all good news?

Well, the unit is expensive. The cost reflects the build quality and its ability. Whether it’s good value or not, will probably entirely depend on if one realises it’s true worth or not. Anyone who has ever used a similar product to aid in faster, smoother and less fatiguing workflow, will immediately realise its extra abilities and see its value. Those who are still struggling with just their trackpad and cramp, may need to research this a little more. I remember many years ago, well before Loupedeck was around, forward thinking colleagues were getting musical MIDI interfaces and programming them to move sliders in LightRoom. No where near as elegant, but it was the start of realising that we needed a better solution for longer editing sessions.

With use, familiarity kicks in and muscle memory begins to form, allowing very fast use, switching from Library tool sets to Develop tool sets, swiping to get to secondary pages of control dials and touchscreen buttons and so on. Being a tremendously capable and thus complex machine, does mean to get the most benefit, one just has to spend a little time with the CT. As mentioned, it works straight out the box; simple. The more time spent though, the more you realise just how much it can do. So whilst the learning curve is not steep at all, exploration and mastery of just how capable it is, will take a couple of weeks of use. My advice would be to just dive in and get started. It comes together quickly enough. 

I found that without really noticing, I’d transitioned from looking and hunting for a function I wanted, to just doing it. I’d liken it to learning to ride a bicycle or drive a car; suddenly everything just comes together and rather than thinking, you’re just doing. 

Loupedeck CT at my Apple Mac workstation. London, UK. April 01, 2021. Photo: Edmond Terakopian

Final Thoughts

Based on how well my Loupedeck+ has performed over the last two years I’ve used it and based on the build quality of the CT, which feels much more substantial and solid than the Loupedeck+, I have no hesitation in thinking that the CT will be a good investment as a piece of professional grade, daily use equipment, which will last many years. 

Taking into account just how customisable it is, means that the software with which we use it, in my case mainly Adobe LightRoom Classic, the unit will adapt to changes or new controls introduced during updates to these programs. Remember how Adobe brought out the Texture control? Brilliant tool, but the Loupedeck+ couldn’t physically have a labelled slider, so had a programmable dial reprogrammed instead. With the CT though, as it’s so highly customisable, I don’t foresee any such issues. It will just adapt, with keys and dials just remapped to accommodate, along with a nice graphical label showing exactly what’s what. 

Weighting up all these variables, including the price of the unit, I conclude that it will be an investment very well made. Cutting out fatigue, cramps or strain, whilst allowing a faster workflow with more precise control over processing, makes it a great product. It’s a no brainer in reality. So, whilst an expensive peripheral, my experience is that it’s not overpriced and considering the workflow and health gains, it’s actually of good value.

Working efficiently and without fuss. Our tools should never get in the way of our creativity, which must flow unhindered. The Loupedeck CT has done just that. Let me work without being aware of it.