Category Archives: Review

EddyCam Camera Strap Review

Ergonomics. Speed. Megapixels. Focal Length. Aperture. All considerations we photographers make when choosing a camera and lens. All very important considerations, of course.

Then out in the field or in our studio, we put our carefully chosen equipment to the task of helping us create the photographs we envisage, either by observation of the world around us or from the creative concepts within. You reach for your camera at that critical moment, as the juxtaposition of life becomes perfect or your model gets into their groove, yet is slips off your shoulder, you fumble, get a grip, raise it to your eye and that fleeting moment has disappeared and you’ve missed your picture.

EddyCam Edition 35mm in cognac brown camera strap with natural contrast seams, on my Leica M10-D, Leica brown leather protector case and Leica 50mm Noctilux ASPH. London, UK. July 18, 2020. Photo: Edmond Terakopian

If you’ve never worked as a photojournalist, wedding photographer, street photographer and so on, that may seem like a tad of poetic license, but anyone working in a genre which requires fast reactions, especially when working with multiple cameras, has been there. Especially in these genres of photography that involve a lot of moving around, often with two, sometimes even three cameras, for long periods of time. As mentioned, photojournalists, wedding photographers, street photographers, to name a few disciplines, will all know this feeling; cameras that slip off your shoulder not only become very frustrating, they do make you miss a picture. Sometimes as a journalist, you find yourself running (either towards a breaking story or away from an unfolding danger) and cameras which slip off the shoulder aren’t only frustrating, but will slow you down as you need to keep adjusting.

The thousands you spent and the days you agonised over camera and lens choice, don’t reach their potential as the camera slipped when you reached for it. Or as you’re running around a corner during a speedy walk about by a politician in a rush to get back to his office and away from his constituents, and the camera slips off your shoulder and pendulum actions itself into a brick wall (something I’ve personally ‘enjoyed’ doing, many years ago!). Or the tiredness setting in as the cameras on your shoulder or your neck become uncomfortable and you get sweaty, the fatigue and discomfort soaking up your creative energy and stamina for working.

EddyCam Edition 35mm in cognac brown camera strap with natural contrast seams, on my Leica M10-D, Leica brown leather protector case and Leica 50mm Noctilux ASPH. The leather end pieces and the nylon connection straps are sewn five times with special thread, which guarantees a high tensile strength. London, UK. July 18, 2020. Photo: Edmond Terakopian

All of this is down to one simple choice. Your camera strap. It’s the simple accessories we spend less time considering that can make our lives easier, more comfortable and fruitful, or frustrating, fatiguing and non-productive. Simple accessories like memory card wallets, battery holders, small bags for cables and adapters, and of course, camera straps.

I have to admit of never really looking at EddyCam before. I had noticed the company on my periphery, but as I had discovered UpStraps more than a decade ago, I wasn’t really interested in other camera straps. UpStraps gripped my shoulder like nothing before. Ugly, inelegant but absolutely practical, with a big chunk of rubber. Very uncomfortable on the bare neck though, but this had been my choice, along with my colleagues’, for a long, long time.

On assignment with the EddyCam Edition 35mm on my Leica M10-D. I hadn’t yet got the Edition 50mm Shoulder straps for my Lumix cameras yet and they’re still on UpStraps. Edmond Terakopian on assignment, covering the clapping for carers, in appreciation of the nurses, doctors and staff at the NHS during the COVID 19 pandemic lockdown. Chelsea and Westminster Hospital, Fulham Road, London, UK. May 28, 2020. Photo: Jeff Moore

Purely through an exploration based on aesthetics, I started to have a look around online, for a new strap to compliment my Leica M10-D. I’d got a very elegant and practical Leica leather half case, in brown, and wanted to see if I could find a nice brown leather strap for it. The huge issue being that it had to be practical. It basically needed to stay put on my shoulder, be comfortable on my neck and the fashionista in me also wanted it to look good with my Leica combination. I had previously, years before, been through the fashionable and unpractical straps made by various purveyors of beautiful, yet unpractical straps. Google and YouTube then brought me to EddyCam.

Leica M10-D with 50mm Noctilux ASPH in a leather Leica half case and cognac Eddycam Edition 35mm leather camera strap. London, UK. June 29, 2020. Photo: Edmond Terakopian

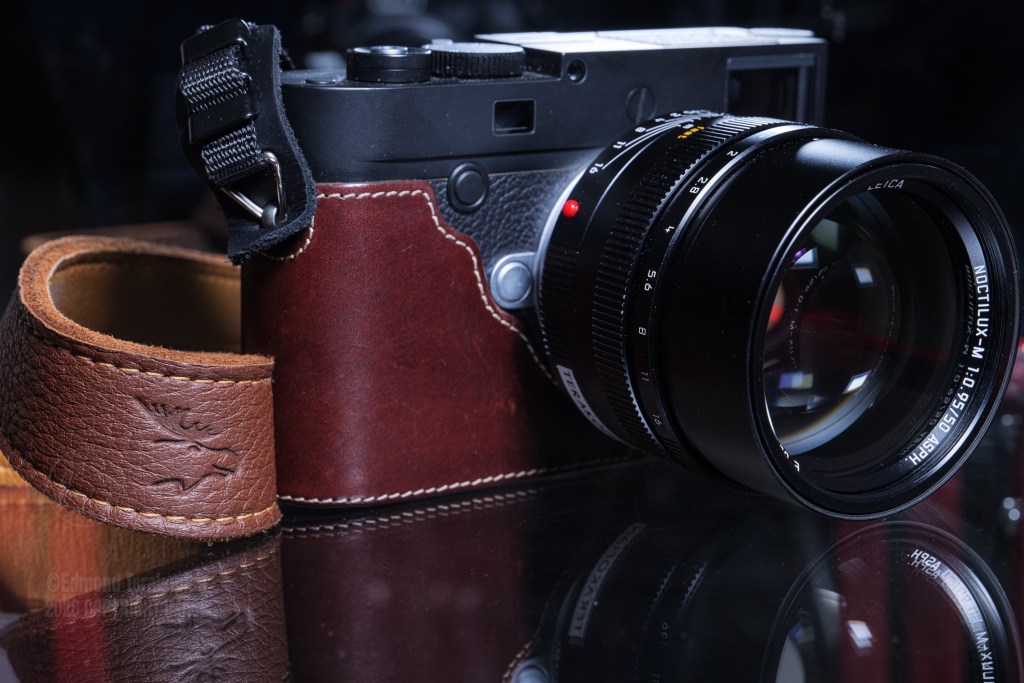
When I saw the Edition 35mm cognac brown version, it seemed to tick all the boxes. Strangely, the first thing that immediately caught my eye and made me look at the strap as a serious contender, was the double X pattern stichting on the leather end pieces, which connect the main elk leather strap to the webbing. This was craftsmanship and manufacturing which was clearly made to last, and made for real use. There are so many beautiful straps with a couple of stitches or eyelet connectors, that make me wince in horror at the thought of them coming undone and my camera crashing to the ground whilst on assignment. This however, was properly designed, for heavy use in the field, by photographers who want to use their cameras as opposed to photograph their cameras on cafe tables.

I also liked the notion of an un-padded leather strap, which meant it would be soft, easily wrapped around the wrist and comfortable in use. The shape of it also showed that it should stay comfortably on the shoulder. The website stated “The patented lines, created together with orthopaedists, are so formed that you can easily carry it on your shoulder, around your neck or diagonally”.

The Edition 35mm In Use

I’m pleased to say, the orthopaedists clearly knew their stuff as did Edlef Wienen (Eddy), the brains behind the product. It came as no surprise when I later found out that Eddy is a very keen photographer of decades and also an avid hiker. I’ve found when something is conceived and created from passion and experience, it truly rises to a different level.

I have to admit to never having been aware of elk skin, so when I read the EddyCam straps are made from this, it did make me ponder. The company’s website states “Elk-skin is one of the thickest leathers there is – very sturdy and almost indestructible. At the same time, almost no other leather is as fine and soft as elk-skin”. It does seem a contradictory reality, but after receiving the Edition 35mm, it clearly is so. Extremely soft, but very tough too. The contrast stitching and two tones of leather, along with the high end webbing straps, which still remain malleable, even down to the coated and rounded stainless steel clips, just ooze quality.

Packed for my next assignment. Lumix S1 and S1R with Lumix S Pro 16-35 f4.0, 24-70mm f2.8 and 70-200mm f4.0 in a MindShift PhotoCross 15 backpack. Leica M10-D with a 50mm Noctilux ASPH and 35mm Summilux ASPH FLE in a ThinkTank Photo Retrospective 5 shoulder bag. All cameras on Eddycam straps. London, UK. June 10, 2020. Photo: Edmond Terakopian

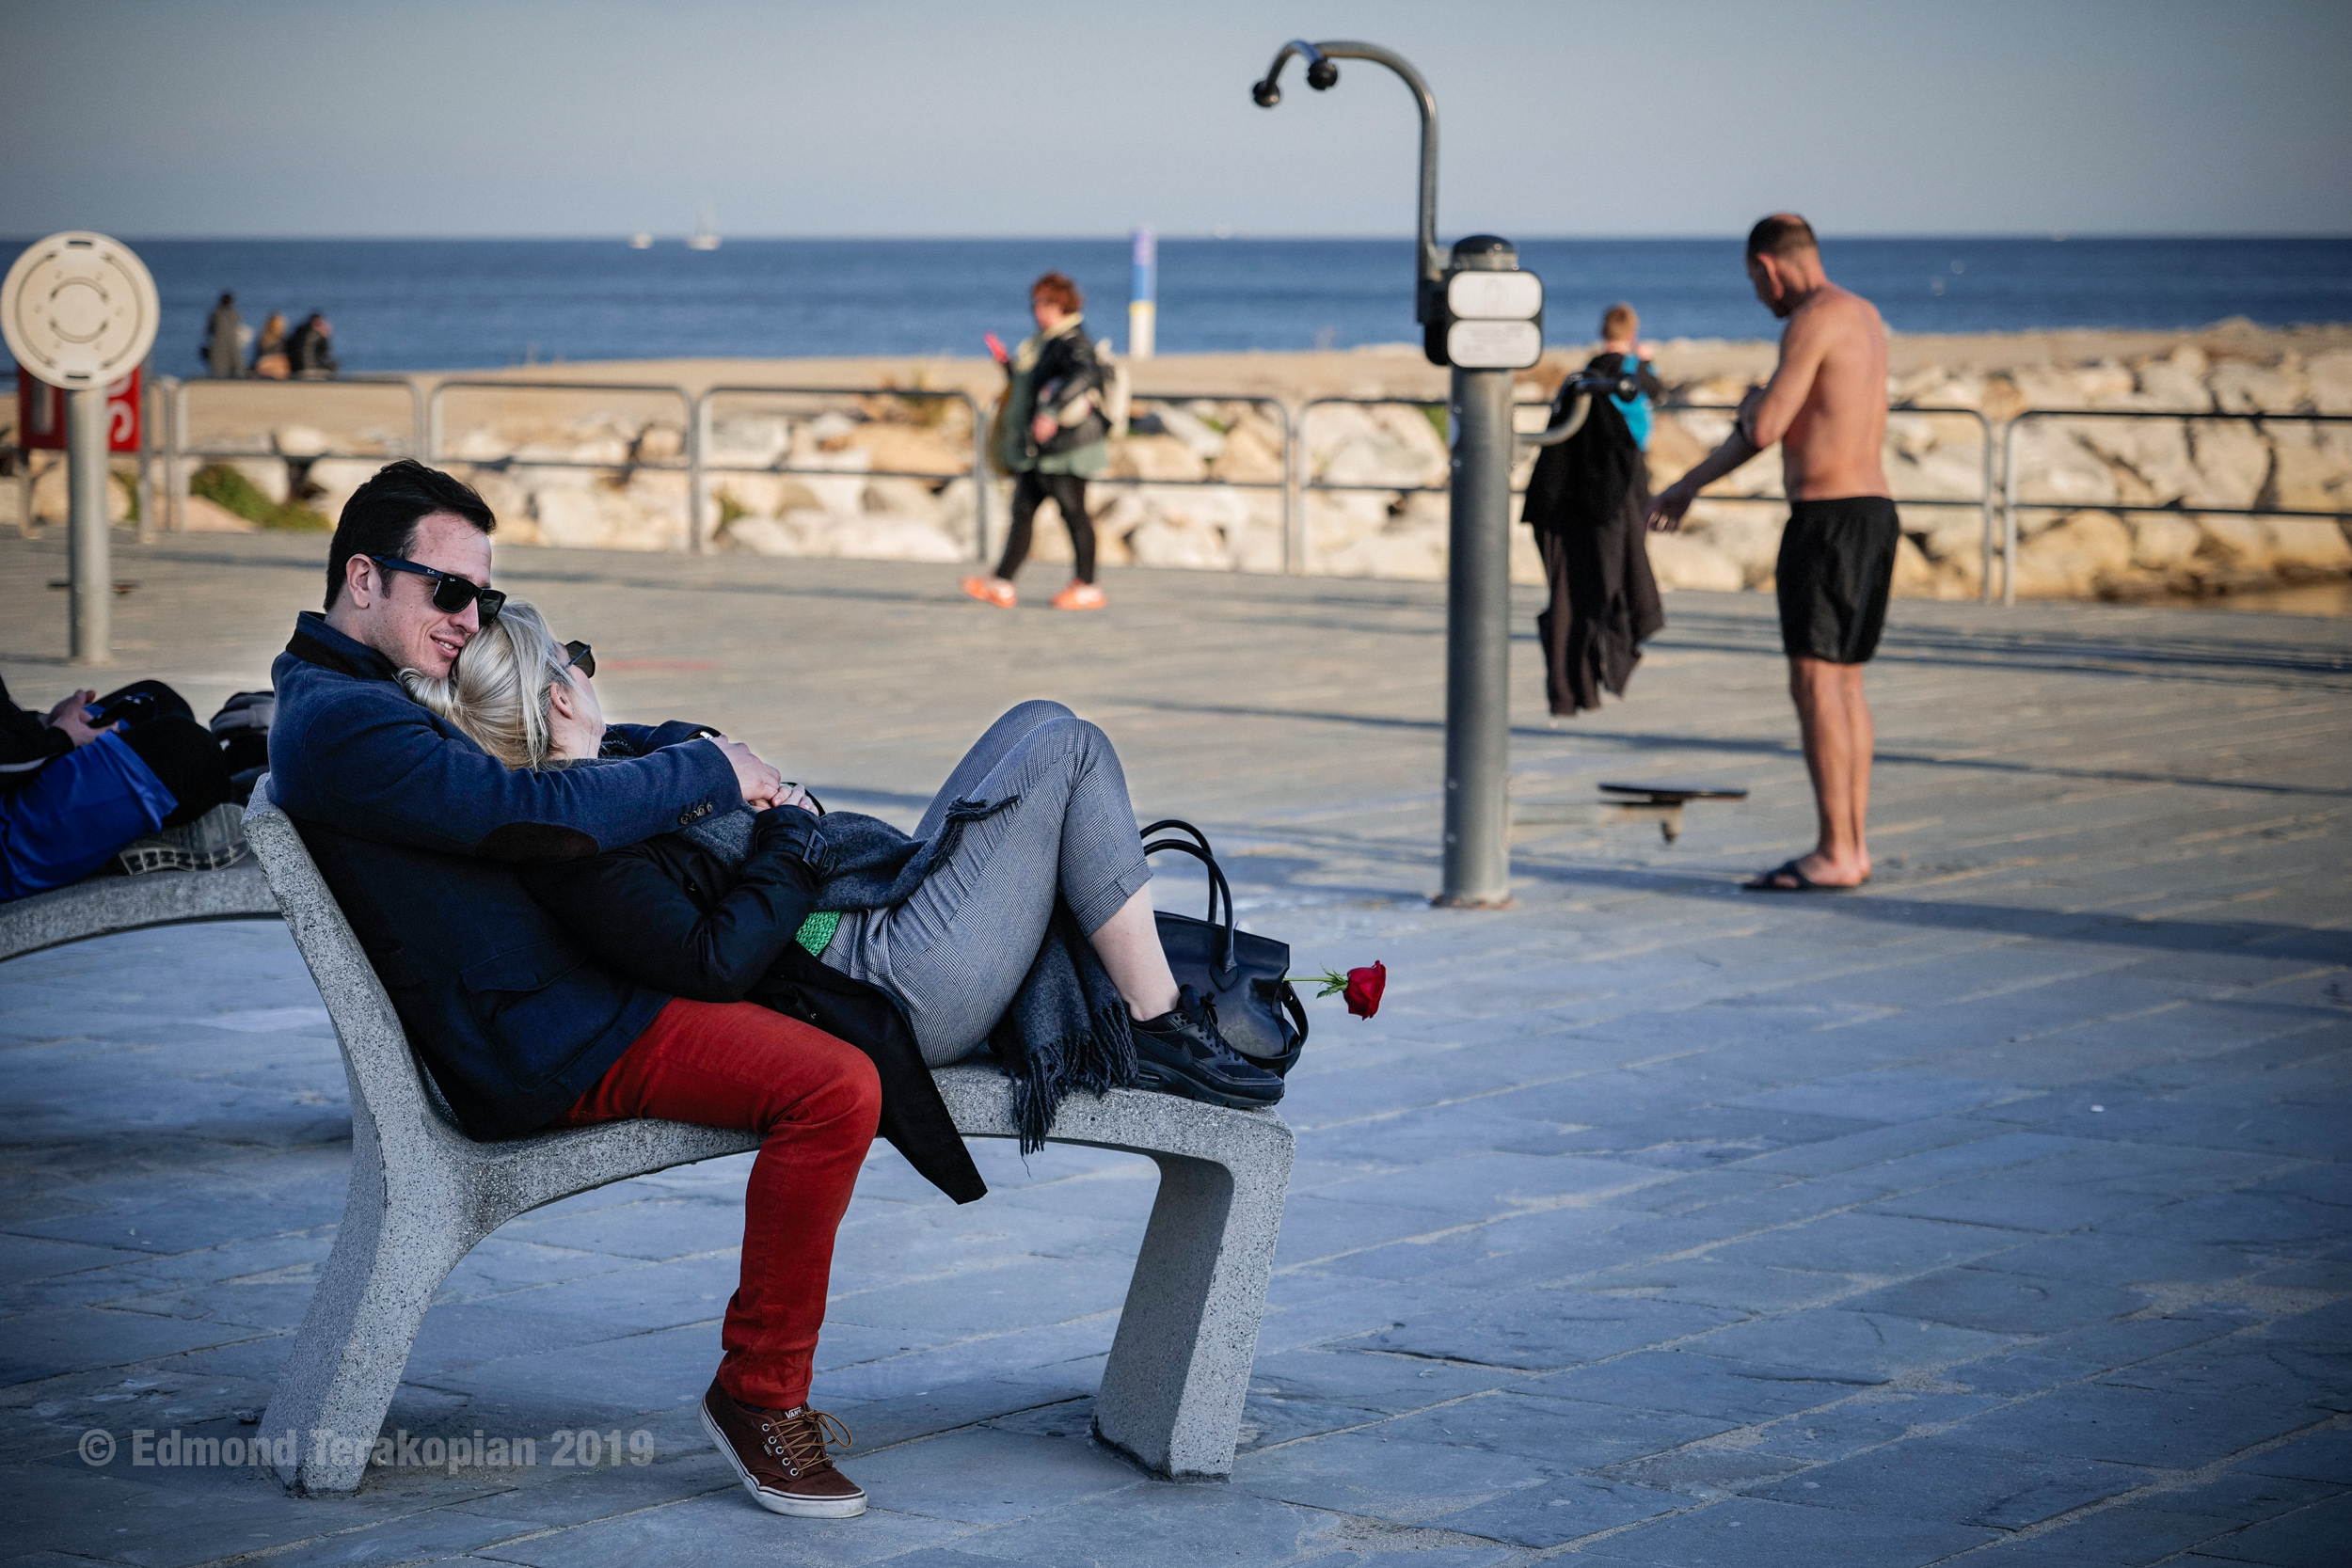
One wonderful aspect of the strap is also a little bit of elasticity, which translates into more comfort when worn. Don’t get me wrong, it doesn’t bounce, but it gives it a little of suspension by stretching roughly an extra 2cm along it’s entire length. A Leica M10-D is a small camera, but it’s solid, so weigh’s more than one assumes. Add a Leica 50mm Noctilux ASPH and you’ve got some heft. I’ve found wearing this combination either around my neck or on my shoulder, has been supremely comfortable and crucially, non slip too. I’ve walked the streets for hours, when documenting the COVID 19 lockdown, or photographed clapping for carers outside a London hospital, working inside a church when services resumed and always found my camera stayed on my shoulder, remaining comfortable. When worn around my neck, against bare skin, it also always remained extremely comfortable.

It’s one thing making a beautiful and elegant strap; it’s a totally different thing making a strap which is practical and usable in real life scenarios. EddyCam has managed to combine both these things. In a career spanning 31 years, I’ve never found any strap which achieves both these qualities.

The Shoulder Range

I was so impressed by the Edition 35mm for my Leica, that I started looking further into the entire range. I wanted a strap for my Lumix S1 and S1R. When on assignment I’ll often work with two cameras. One with a Lumix S Pro 70-200mm and the other with either a Lumix S Pro 24-70mm or 16-35mm, depending on the assignment. My search led me to the Edition 50mm black on black Shoulder version.

EddyCam Edition 50mm, black on black Shoulder version camera strap, on my Lumix S1R and Lumix S Pro 70-200mm f2.8. London, UK. July 18, 2020. Photo: Edmond Terakopian

The bigger and heavier S Series needed a slightly wider strap to spread the load more as well as a little padding. The materials on this edition differ slightly too; Finnish elk skin on the outside and Mongolian yak leather on the inside. The yak leather brings even more grip. As a result, it’s not as soft as the elk leather, but certainly not abrasive either, nor as uncomfortable as rubber against the skin, so whilst the S Series cameras usually reside hung on my shoulders, around the neck things didn’t become uncomfortable. One could also of course flip the strap over for a softer feel.

Hours spent on assignment, indoors, outdoors, worn on top of various materials of shirts and jackets, all resulted in one universal outcome; comfort and grip. The camera just stays put. The strap grips very well indeed, is extremely comfortable and just wide enough without being too wide, so easily packs away in a camera bag.

EddyCam Edition 50mm, black on black Shoulder version camera strap, on my Lumix S1R and Lumix S Pro 70-200mm f2.8. The leather end pieces and the nylon connection straps are sewn five times with special thread, which guarantees a high tensile strength. London, UK. July 18, 2020. Photo: Edmond Terakopian

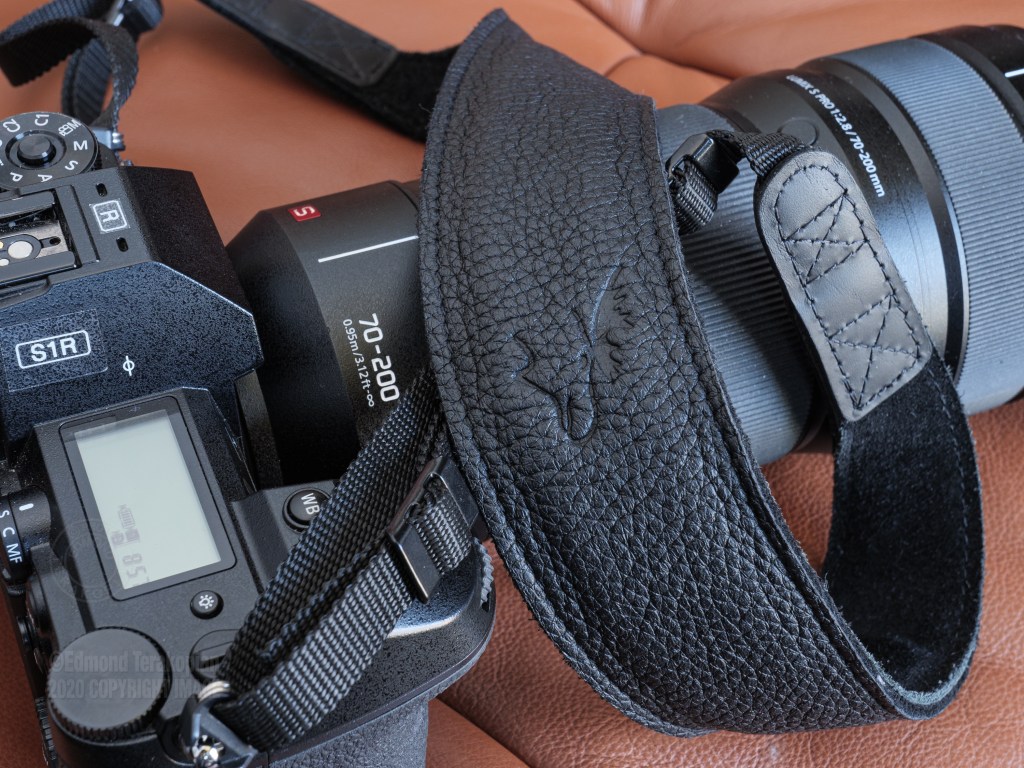
I had one reservation before getting the 50mm shoulder version though. As the straps are ergonomically shaped, my worry was that it may not work with my camera mounted with a 70-200mm. With longer lenses, I often turn the camera so the prism is pointing inwards (always on my left side so the shutter isn’t accidentally pressed when it rests on my side). This way the longer lens points downwards rather than outwards, which makes moving around easier and the lens is less prone to bash into things or people. The yak underside has so much grip though, that to my joy, I found the strap works on either shoulder, regardless of the direction it’s facing (although a little better when carried properly as the ergonomic curve helps it rest better). Also, the benefit of having elk on the top side means that if you want to carry your camera diagonally across your body, you can twist the strap so the elk side is in contact with you, meaning you can comfortable slide the camera from your side, to your front and shoot. As before, there’s a tiny bit of elasticity in the strap; it’s much less than the Edition 35mm, but does move a tiny bit, around 1cm along it’s entire length, giving you a little bit of suspension. Lastly, the internal natural rubber padding, which is just right as it’s not too thick, makes the strap sit extremely comfortably, even with a heavier professional body and longer lens, even for extended periods of time.

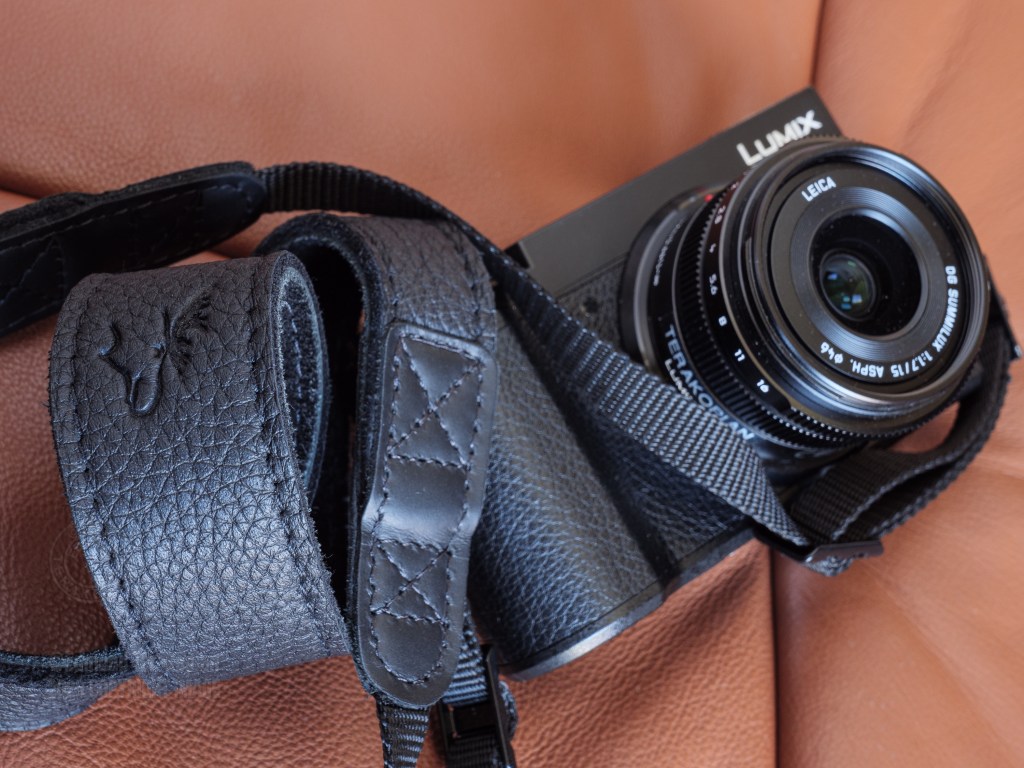
I also got another strap from the shoulder range, an Edition 35mm black on black Shoulder version for my Lumix GX9. This is identical in size and shape to the Edition 35mm cognac brown version, but has the yak leather on the underside for that extra grip, but lacks the rubber padding of the wider Shoulder versions. I really liked using this version of the strap too and my observations on its performance are as above.

EddyCam Edition 35mm, black on black Shoulder version camera strap, on my Lumix GX9 and Leica DG Summilux 15mm lens. London, UK. July 18, 2020. Photo: Edmond Terakopian

Value

We get the “free” included camera straps in the box with our cameras. Often with bright branding, that from a distance screams “photographer here”. Often with little comfort and very little grip. We also have a range of truly awful straps on the market from various manufacturers, which should be avoided at all costs. There are also several other manufacturers which make a range of straps extending from beautiful to practical. These qualities being mutually exclusive though.

EddyCam is the only manufacturer which I’ve used which has practical elegance, seemingly as an unspoken ethos. It goes further though. Absolutely comfortable, supremely grippy and phenomenally well made. Every aspect, from design, thoughtful choice of materials and production, means this is a first rate product. This is manufacturing at it’s best, realising the concept of design through practical experience and expertise in the field.

Looking at the market, the pricing is nearer the top end. The question is though, is it expensive, or is it good value for money? Having used these straps on assignment and personal work, for over two months, I’m absolutely certain that there isn’t a better camera strap for my needs. I’m also certain that these straps will last for decades. Through several camera changes, easily.

I used to use Nikon burgundy (with yellow stitching) wide camera straps back in the days of film. These were expensive, but lasted many camera changes and I still have them on my Nikon FM2 and F3, over 25 years after purchase. I’ve also used the same UpStraps for well over a decade. Comparing these two straps with my EddyCam straps, I’m absolutely certain the EddyCam straps are the best made and thus will easily outlast them.

When you make this realisation, the cost of the straps becomes extremely good value. In the heat of the moment though, when you reach for your camera and it slips from your shoulder, making you fumble and end up missing that picture, that’s when you will wish you bought that EddyCam.

Panasonic Lumix S1; Hands On Preview


Three and a half weeks with the full frame mirrorless Lumix S1 Camera

Red rose of love. Daily life, Barcelona, Spain. January 27, 2019. Photo: Edmond Terakopian *NB Test shot with a prototype Lumix S1* **Image taken with a Lumix S1 preproduction sample (Image quality not final) Processed from in camera jpeg**

Story telling. That’s what my reason is for picking up a camera. As a photojournalist, a street photographer, a portrait photographer, a commercial photographer, my need for a camera is to capture the essence, subtlety and feel of my subject, tell their story at that moment.

Portrait of violinist Asia JimŽnez Ant—n de Vez. London, UK. January 18, 2019. Photo: Edmond Terakopian *Test shot with a prototype of a Panasonic Lumix S1. Copyright Photo* **Image taken with a Lumix S1 preproduction sample (Image quality not final)**

The Lumix S1 has been with me for over three weeks and I found myself not shooting with anything else. The birth of a new system for Panasonic Lumix, and the start of a fresh new camera system. Yet the camera feels completely accomplished. My prototype camera, with pre-production early firmware, behaved impeccably, never letting me down. It didn’t matter the subject matter, the level of light , the speed, the cold; it just worked. 

Edmond Terakopian at the Lumix S1 Launch Event, shooting in a chocolate factory using a Lumix S1R with S Series 50mm f1.4 lens. Barcelona, Spain. January 29, 2019. Photo: Yoshie Nishikawa **Image taken with a Lumix S1 preproduction sample (Image quality not final) Processed from in camera jpeg**

To sum up, in a nutshell, the S1 is extremely impressive. The quality is just stunning, in every aspect; image quality, camera handling, system design and build quality.

Lumix S1 Launch Event. Barcelona, Spain. January 30, 2019. Photo: Edmond Terakopian. *Shot on a prototype, pre-production firmware Lumix S1R* **Image taken with a Lumix S1 preproduction sample (Image quality not final) Processed from in camera jpeg**

The ergonomics are spot on. The camera just fits and within minutes I was already taking pictures. The button layout, joystick positioning, the placing of the AF button on the back (something crucial for my way of working) is spot on. One superb new feature for this Lumix is the lock button at the back, which can lock the rear buttons. Anyone who runs around with their cameras knows how easy it is to inadvertently find they have set the camera to monochrome HDR mode with bracketing on long exposure! The menu system is also a joy to use; its very well thought out, laid out and the design behind it means there is very little need for referring to the manual. 

Panasonic Lumix S1 full frame mirrorless camera with Lumix S Series 24-105mm standard zoom lens (L-Mount). (NB- Lumix S1 camera is a prototype). London, UK. January 09, 2019. Photo: ©Edmond Terakopian

The build quality and finishing on the camera and lens are sublime. This is definitely a premium, high end camera. One made for serious, daily use, in all sorts of environments. Most professional photographers refer to their cameras as tools; they are the beginning of the journey as it’s only the photograph that matters. These tools are expected to work in all sorts of conditions and never fail; ever. I have a feeling the philosophy behind the design and build of the S Series is going to fit that bill fully. The camera and lenses just inspire confidence in every respect.

I was initially a bit worried at having one camera battery during my testing; I made sure to always pack two USB battery power banks (one wonderful aspect of the top end Lumix cameras is USB charging, which is not only a great convenience when home, but is an indispensible feature for when in the field). It turns out, even with the camera set to sleep after 10 minutes and leaving the camera on constantly, I was managing to still have around 50% battery after close to 1000 photos. All this, in relatively cold conditions.

For most of my initial test period of three weeks, I only had the Lumix S Series 24-105mm f4.0 lens. I’m definitely a fan of faster aperture prime lenses, as I tend to shoot in very low and difficult light. With the lens and body stabilization, married to astonishing high ISO performance meant that I was never really left wanting a faster lens. I didn’t miss any shots. Having said that, I had heard many great things about the S Series 50mm f1.4, so couldn’t wait to make some photographs using that.

Daily life, Barcelona, Spain. January 28, 2019. Photo: Edmond Terakopian *NB Test shot with a prototype Lumix S1* **Image taken with a Lumix S1 preproduction sample (Image quality not final) Processed from in camera jpeg**

One thing that can’t be denied is that the S 50mm definitely has presence. It’s a big and heavy lens. Initially, I was disappointed with the size and weight. I had wished for a smaller lens. Within 15 minutes of having it on the S1, I had shot a couple of test shots under some arches of a member of the Japanese team from Panasonic; the quality was stunning. The sharpness, tonal rendition, shadow and highlight detail, soft falloff of the background. This lens completely impressed. It has character and perfection at the same time. After seeing the results, the size no longer became an issue and the lens almost never came off my camera during three days of shooting with it at Panasonic’s launch event for the S Series in Barcelona, Spain. As a nice icing on the cake, the 50mm is also certified by Leica.

Lumix S1 Launch Event, Barcelona, Spain. January 29, 2019. Photo: Edmond Terakopian *NB Test shot with a prototype Lumix S1* **Image taken with a Lumix S1 preproduction sample (Image quality not final) Processed from in camera jpeg**

The S 24-105mm also definitely impressed me. I have to admit to being a bit of a lens snob; I’m used to shooting with Leica, Leica DG, Zeiss and in earlier years, Angeniuex lenses. I was absolutely bowled over. Not only is this lens sharp, it’s perfectly contrasty and has a phenomenal tonal range. It dealt with shooting in low light or having bright lights without issue. Build quality and feel of the controls match the craftsmanship of the camera.

One thing that has surprised me completely is the level of subtlety I’ve been able to photograph with the S1 and the new S Series lenses. Darker scenes with very subtle gradation and tonal differentiation have been rendered perfectly. The shadow detail and highlight detail have been amazing, even when the same image has had both extremes. It’s also worth pointing out the auto white balance (AWB) worked extremely well, in all but the very mixed and extreme extreme artificial light. I’ve managed to get this level of subtle micro detail and tonal differentiation using a raw converter which is new to me; whilst Silkypix worked and it was a joy to be able to shoot and process raw files on a preproduction prototype camera, I can’t wait for when my preferred imaging software, Adobe’s Lightroom, supports the raw file from the S1. Using software I know intimately is sure to bring a bigger smile to my face when I’m processing images shot on the S1 and extracting even more detail, character and subtlety.

Lumix S1 Launch Event. Barcelona, Spain. January 30, 2019. Photo: Edmond Terakopian. *Shot on a prototype, pre-production firmware Lumix S1R* **Image taken with a Lumix S1 preproduction sample (Image quality not final) Processed from in camera jpeg**

Alongside my eagerness, with almost childlike enthusiasm, to shoot with the S Series 50mm f1.4, I’m was also super impatient to shoot with the larger megapixel cousin, the S1R. In every aspect, the cameras look and behave identically. It’s the sensor and some settings which differ (mainly the highest ISOs and certain video functionality). I only had the S1R for a few hours during the launch event, so my impressions are based on a brief encounter, which left me breathless at the results this camera produces. The size and detail of the images are simply mind blowing, producing a 47.3mp image, which in high resolution mode produces a mid blowing 187mp image. This is truly top end medium format territory, in a smaller and much more dynamic package.

Unique in the full frame market, is the union of Panasonic Lumix and Leica, two camera manufacturers, collaborating around the L Mount, along with Sigma (which I would assume will bring some of their superb ART lenses in the L Mount). This is great news for the Lumix S Series as well as the existing Leica SL community. Panasonic Lumix’s three lenses (24-105mm f4.0, 50mm f1.4 and 70-200mm f4.0) joining an already available portfolio of Leica SL lenses. By 2020, Panasonic Lumix is due to release a further seven lenses. 

Lumix S1 Launch Event. Barcelona, Spain. January 31, 2019. Photo: Edmond Terakopian *NB-Image taken with a Lumix S1 preproduction sample (Image quality not final). Images processed from in camera fine setting jpeg*

It’s a truly remarkable to be so enthused about a new camera system after 30 years of professional photography. My excitement for this system reminds me of when I picked up my first SLR, 34 years ago. Roll on March 2019, when these will be available in the shops!

Alongside the S Series, Lumix Pro service has also been rolled out to support professional photographers: https://lumixpro.panasonic.com/

To see an album of test images, please visit my Flickr album Panasonic Lumix S1 and S1R

I also have an album of product shots and comparisons: Lumix S1 Camera Comparison Shots

Once final production cameras are available, I will be writing a full review. In the meantime, do keep an eye on my Instagram where I will be sharing more images.

Leica CL – Hands On

Hands On Preview Of The New Leica CL

Leica CL Launch-20171121-003

Photographer Edmond Terakopian with the newly announced Leica CL. Leica CL Press Launch. The Den, 45 St Martin’s Lane, London. November 21, 2017. Photo: Robin Sinha

I used to really like my Leica X1; superb quality, large sensor compact camera, with a fixed Leica lens, capable of professional results in a small body. It was with me at all times and I used it on assignments as well as my personal work. Alas, it needed to have a proper electronic viewfinder and equally as importantly, interchangeable lenses. The radically conceptual and interesting Leica TL and TL2 addressed the interchangeable lens issue, but to my dismay didn’t have a built in viewfinder. Although I do sometimes shoot using the rear screen, I’m definitely a viewfinder user and a slide on viewfinder (be it optical or digital) whilst useful, isn’t the answer. They’re inelegant, get in the way, add bulk, come off and can easily be lost.

The rumour mills started showing leaked images of the Leica CL. An interchangeable lens, compact mirrorless camera with a built in viewfinder. Of course, one can never trust these rumours, but when I received an invitation by the lovely folks at Leica UK for a press launch, I realised this may just be for real. I’m delighted to say, it is a reality.

It’s a truly beautiful and elegant design, sharing a look very reminiscent of it’s great grandfather, the Leica III. Even without the red dot, it is instantly recognisable as a Leica and carries this heritage forward. The design, craftsmanship and build quality are really top notch. This is definitely a “real Leica”. It feels right in the hand.

Leica CL Test Shoot-20180104-147

A portrait of Arteh Odjidja at the Leica CL Press Launch. Test shot using the Summilux-TL 35 f/1.4 ASPH. The Den, 45 St Martin’s Lane, London. November 21, 2017. Photo: Edmond Terakopian

The mark of a well thought out design, one crafted by engineers who are passionate photographers and not just very clever folk, is that when you pick it up, you can just start to use it. Without looking at a manual or much fuss at all, I took to its beautifully designed and elegant switchgear; ergonomics which have been thought through just make the camera a very natural and comfortable extension of the photographer. The twin dials with push down control clicks and a small screen between them means that modes and settings can quickly be navigated not only without fuss, but very naturally. My only gripe here is that in manual mode, it would be nice to be able to change the dials’ functions so that shutter speed and aperture can be swapped around if needed. Hopefully a firmware upgrade can take care of that.

Leica CL Test Shoot-20180104-067

A portrait of Robin Sinha at the Leica CL Press Launch. Test shot using the Summilux-TL 35 f/1.4 ASPH. The Den, 45 St Martin’s Lane, London. November 21, 2017. Photo: Edmond Terakopian

When other camera manufacturers look at the simplicity and elegance of design with a perfect layout of buttons, dials and screens, they’ll hopefully realise that shoving extraneous buttons all over their camera’s isn’t really necessary and is in fact counterproductive to photography. The same can be said of the menu system, which essentially includes a favourite’s page and is very elegantly done. No PhDs needed to operate this menu system!

By now, I’m sure you’ve seen the specifications online, but the main points are:

24.2mp APS-C CMOS sensor with a 14 stop dynamic range

ISO range of 100 to 50000

10 frames a second on continuous drive (with three speed settings for continuous) with a 33 frame buffer (jpeg and raw DNG)

Flash sync speed of 1/180th

EVF has 2.3mp with an eye relief of 20 mm (superb for spectacle wearers)

The autofocus system is contrast based and has 49 points

The files lend themselves beautifully to the monochrome treatment; the lenses and sensor being matched nicely to get a smooth and wide tonal range also produce a phenomenal dynamic range. All the key ingredients for beautiful black and white photography are present.

I had the camera for around 20 minutes, so of course this post isn’t an exhaustive test. Some colleagues whose opinion I value have had more time with the camera, and I will post some links at the end of this article. However, one thing I can usually tell in the first few minutes of picking up a new camera is if it’s going to work for me. The Leica CL gave me the feeling that it definitely will. It’s right in the hand, focuses quickly and accurately, has a decent amount of AF points spread across the frame, has a fast drive when needed, intelligent menu system and of course, has Leica lenses. The main reason for me choosing Leica, by far, is the Leica lens. I made this decision back in early 90s when I bought my first Leica (an M4-2) after having tried an M3 for a few weeks back in 1989. Another wonderful thing about the CL is that with an adapter, Leica M lenses can be fitted and used (with a x1.5 crop factor).

I do wish it had a few things though. I would have really liked to see a joystick on the back for moving the AF point around quickly with he camera to the eye. I feel any serious camera needs to have a joystick. A built in stabiliser would have also been most welcome. Although the video specs are good, I didn’t even bother to shoot video as there are no microphone or headphone sockets, so perhaps having these would have been a nice touch, making the camera more usable, but I assume it would have added bulk.

As with any conversation involving Leica, the price always comes up. I’ve already had several conversations about pricing with friends and colleagues on my social media. Leica have always been more costly. No compromise lens design and low quantity manufacturing has always meant that price wise they will never be on par with the gigantic Japanese manufacturers. However, if the look and feel you get from your images is important to your work, then a Leica will help bring out that much more from that moment when you decide to press the shutter release.

The full frame bigger brother, the Leica SL, was of course Leica’s first mirrorless, interchangeable lensed, built in EVF camera. Some very impressive specs, beautiful image quality and absolutely stellar lenses, alas never convinced me to get one. Simply because the lenses were huge. Smaller lenses are rumoured to be on their way though, so perhaps I may reevaluate my stance in the future. Until that moment, for me, the CL is Leica doing mirrorless correctly. It ticks so many boxes and feels absolutely right in the hand and in use. Dear Santa……


My Leica CL Flickr Album

Some atmospheric photographs of the Leica CL from Leica Camera.

Further Reading about the Leica CL:

Sarah M Lee puts the new Leica CL through its paces; TENDER ARE THE NIGHTHAWKS

Testing The Leica CL, by Jono Slack

Leica CL Review by Andy Westlake


RODELink Review

My Review Of The RØDELink Filmmaker Kit

The new Rodelink wireless setup. May 19, 2015. Photo: Edmond Terakopian

The new Rodelink wireless setup. May 19, 2015. Photo: Edmond Terakopian

Easy. That’s the surprise when you first setup the new RODELink. So easy to setup and start shooting with. One button pairing, digital wireless and a distance of up to 100 meters.

The RodeLink Film Maker Kit on my Olympus OM-D E-M5 Mark II. May 16, 2015. Photo: Edmond Terakopian

The RodeLink Film Maker Kit on my Olympus OM-D E-M5 Mark II. May 16, 2015. Photo: Edmond Terakopian

Rode’s first wireless system works a treat; fast to get going with and great audio too. The Filmmaker Kit comes with a transmitter receiver, the excellent Rode Lavalier mic and also a minijack cable for attaching the receiver to your camera or audio recorder.

Olympus OM-D E-M5 Mark II Review

Is The Sequel Any Good?!

Cameras come and cameras go. It’s a cycle that every manufacturer repeats every few years. As a professional photographer, I naturally keep my eyes open for new and better tools and as a reviewer of camera equipment for my blog and also various magazines over the years, I naturally get to use and review a lot of equipment from a lot of the main brands in our industry.

The new Olympus OM-D E-M5 Mark II fitted with the HLD-8 Power Battery Grip. February 05, 2015. Photo: © Edmond Terakopian

The new Olympus OM-D E-M5 Mark II fitted with the HLD-8 Power Battery Grip. February 05, 2015. Photo: © Edmond Terakopian

So, how do I know if a camera is any good? Well, one sure way is at the end of the test, when I box away the camera to send back. If at this stage I feel bad and want to hold on to the camera, that gut feeling says it all. As I boxed away the OM-D E-M5 Mark II last night and begun taping up the box, I really wished I could keep it!

The new Olympus OM-D E-M5 Mark II. The two grips, the HLD-8 Power Battery Grip. February 05, 2015. Photo: © Edmond Terakopian

The new Olympus OM-D E-M5 Mark II. The two grips, the HLD-8 Power Battery Grip. February 05, 2015. Photo: © Edmond Terakopian

Although I never used Olympus in the days of film, I always really fancied the OM3Ti; to the point that even now, once in a while I’ll look them up on eBay! When Olympus launched the first PEN, the E-P1, my interest in the company’s cameras was re-invigorated. Since, I’ve owned and use various PEN cameras, the most recent being the brilliant E-P5. When I saw the first OM-D, the E-M5, I did rather like it and when I saw the E-M1, I did rather love it. It was a camera that just felt perfect from the second I picked it up and since has become my most used camera system, putting my Canon DSLR and Leica M setups in early and part time retirement. I’ve been using the new E-M5 Mark II for exactly two weeks now. My first outing with it was a video shoot of an anti ivory demonstration at the Chinese Embassy, which will be used in the feature length documentary, The Last Animals. Having played with the camera the evening before, it gave me such confidence in it’s abilities that I was happy to take it on a real and important assignment the next day. Although I brought a Canon 5D MkIII as a backup, just in case, the little Olympus worked faultlessly and perfectly, allowing me to shoot the entire demo with it. The camera’s ergonomics and menu system are very well designed. Not having a manual for the two weeks meant having to figure everything out by exploration and I’m happy to say that everything just came together nicely, all because of a well thought out camera, by designers and engineers who clearly understand photography and photographers.

A rare Ferrari 288 GTO  built in 1985 with only 883 miles on the clock. It is valued at £2,000,000 and available from H.R. Owen in South Kensington, London. Image shot on the Olympus OM-D E-M5 II, using the multi shot sensor shift facility, creating a 40 megapixel image. January 30, 2015. Photo: ©Edmond Terakopian

A rare Ferrari 288 GTO built in 1985 with only 883 miles on the clock. It is valued at £2,000,000 and available from H.R. Owen in South Kensington, London. Image shot on the Olympus OM-D E-M5 II, using the multi shot sensor shift facility, creating a 40 megapixel image. January 30, 2015. Photo: ©Edmond Terakopian

One of the highlight aspects of the E-M5 Mark II is it’s new high resolution mode; the resolution is boosted from it’s normal 16mp to a whopping 40mp. It does this by taking eight images, shifting the sensor for each shot and combining them into a 40mp jpeg, all in a matter of seconds. As the camera can fire up to 11 shots in the silent continuous mode (more of this later), the actual picture can be taken in under or around a second, so long exposure’s aren’t needed.

A rare Ferrari 288 GTO  built in 1985 with only 883 miles on the clock. It is valued at £2,000,000 and available from H.R. Owen in South Kensington, London. Image shot on the Olympus OM-D E-M5 II, using the multi shot sensor shift facility, creating a 40 megapixel image. January 30, 2015. Photo: ©Edmond Terakopian

A rare Ferrari 288 GTO built in 1985 with only 883 miles on the clock. It is valued at £2,000,000 and available from H.R. Owen in South Kensington, London. Image shot on the Olympus OM-D E-M5 II, using the multi shot sensor shift facility, creating a 40 megapixel image. January 30, 2015. Photo: ©Edmond Terakopian

A detail crop; A rare Ferrari 288 GTO  built in 1985 with only 883 miles on the clock. It is valued at £2,000,000 and available from H.R. Owen in South Kensington, London. Image shot on the Olympus OM-D E-M5 II, using the multi shot sensor shift facility, creating a 40 megapixel image. January 30, 2015. Photo: ©Edmond Terakopian

A detail crop; A rare Ferrari 288 GTO built in 1985 with only 883 miles on the clock. It is valued at £2,000,000 and available from H.R. Owen in South Kensington, London. Image shot on the Olympus OM-D E-M5 II, using the multi shot sensor shift facility, creating a 40 megapixel image. January 30, 2015. Photo: ©Edmond Terakopian

The processing of the eight images then takes a couple of seconds. A tripod is a must and your subject needs to be still, but I can see a lot of creative uses of this with moving subjects! The results are astonishing though. An image dimension of 7296 x 5472 takes things into the higher end of medium format territory. The results are pin sharp, full of detail and tonal range. Whilst this wasn’t a feature I was enamoured by when I first found out about it, having used it, it has really blown my mind!

Taxi Rank, Paddington Station, London. Image shot on the Olympus OM-D E-M5 II, using the multi shot sensor shift facility, creating a 40 megapixel image. February 01, 2015. Photo: Edmond Terakopian

Taxi Rank, Paddington Station, London. Image shot on the Olympus OM-D E-M5 II, using the multi shot sensor shift facility, creating a 40 megapixel image. February 01, 2015. Photo: Edmond Terakopian

To download a full resolution file of the above image and see for yourself, follow THIS LINK. The other huge feature of the E-M5 Mark II is an updated and even more capable 5-axis in camera stabiliser. In a nutshell, every axis of movement is stabilised, meaning hand held shot are possible at very slow shutter speeds for pin sharp photographs. With practice I found I can shoot hand held at down to almost a one second exposure.

Shooting Video

This stabiliser also works in the video mode and in this aspect, pushes the camera to be one of the most able video shooting stills cameras around. It frees the user up to shooting so much more hand held shots. In my short film Taxi Driver, I shot the majority of shots completely hand held. Something I would never do with a DSLR, even with a stabilised lens.

Some of the shots in the film were done by attaching the camera and a mic, onto the windscreen of the taxi or to the bonnet, using a Delkin Fat Ghecko vehicle mount. This triple suction mount worked perfectly, but on it’s own offers no means of stabilisation. Considering how much a diesel London Taxi vibrates and the state of the bumpy roads in some parts of town, the smooth results just blew me away. The stabiliser is both extremely capable and extremely freeing, allowing you to shoot and create, without worrying about steadycams or a tripod. In fact, the only scenes I used a tripod and monopod were for the interview in the cafe and a few shots of a taxi rank. The rest of the seven hour shoot was freehand! By adding a grip (either the HLD-8 or HLD-8 Power Battery Grip) one also adds a headphone socket. This is essential for being able to monitor what the microphone is picking up and really makes this camera an even better video shooter. Thankfully, the audio gain level (along with ISO, aperture, shutter speed and headphone volume) can be changed using the silent touch screen during video shooting. Brilliant!

The new Olympus OM-D E-M5 Mark II. Picture shows the all important headphone socket, now part of the optional (and essential) grip, the HLD-8G and HLD8 Battery Power Grip (shown), February 05, 2015. Photo: © Edmond Terakopian

The new Olympus OM-D E-M5 Mark II. Picture shows the all important headphone socket, now part of the optional (and essential) grip, the HLD-8G and HLD8 Battery Power Grip (shown), February 05, 2015. Photo: © Edmond Terakopian

Thankfully, we now have variable frame rates, meaning that 60p, 50p, 30p, 25p and 24p can be used for full 1080p HD video. The video file itself is very beefy! ALL‑I has a data rate of 77Mbps. IPB gives the following data rates in the following quality setting: SF: ~52Mbps, F: ~30Mbps, N: ~18Mbps. Having shot the majority of the two films in ALL-I at 77Mbps, I can say that the detail holds up extremely well, rendering both highlight and shadow detail properly, allowing for proper grading. It also pushes the camera’s data rate into one the BBC with their stringent guidelines should approve of. Another very handy feature is various levels of slow motion (and speeded up footage) available in camera. I have made good use of the slow motion and am very pleased with the results. You can see this in action in my London Taxi film mentioned earlier.

The new Olympus OM-D E-M5 Mark II fitted with the HLD-8 Power Battery Grip and Rode Steroe VideoMic X. February 05, 2015. Photo: © Edmond Terakopian

The new Olympus OM-D E-M5 Mark II fitted with the HLD-8 Power Battery Grip and Rode Steroe VideoMic X. February 05, 2015. Photo: © Edmond Terakopian

On the audio front, the camera has the all important audio limiter, meaning loud sounds or a raise in volume won’t blow the audio and make it useless. The audio is also recorded at 16 bit, 48Hz, Wave Format Base, meaning it’s actually of better than CD quality and not compressed. Naturally there is an on screen audio meter during shooting. Although the camera has built in stereo microphones, it also comes with the essential mic socket, and during filming my Rode VideoMic Pro and Rode Stereo VideoMic X found themselves at home and recording great audio. Other Goodies The flip out, articulated screen is a great bonus which allows various camera angles to be used with ease. One thing I found I was going a lot was flipping it so the screen was hidden from view and the camera resembled a film camera. This is great as it’ll stop the chimping photographer, make them concentrate on the scene and not the camera back and as a result save on battery power. During the interview scene in London Taxi, I was shooting multicam, and the screen allowed me to tilt it on the wide camera, meaning I could keep an eye on it and on the one in my hand; very handy indeed. Another very handy aspect for me was the practically silent shutter. It can barely be heard and on the street, it should be completely inaudible. Need to take pictures in a monastery of monks who have taken a vows of silence? Not a problem as there is also a completely silent electronic shutter mode. And yes, I do mean silent. Completely. Zero sound. It’s absolutely astonishing to put the camera into silent continuous and know one’s shooting 11 frames per second, in absolute, total and complete silence! In normal mode, the barely audible shutter mode means in continuous mode, the count drops by a frame to 10fps.

London Taxi driver Terry Bradford. January 31, 2015. Photo: Edmond Terakopian

London Taxi, St Paul’s Cathedral. January 31, 2015. Photo: Edmond Terakopian

The built in WiFi remains from the previous cameras and married to the Olympus O.I. Share app on iOS means you can download jpegs (I always shoot RAW and medium jpeg for just this reason) and also have full, wireless remote camera control. This naturally opens up huge possibilities and also allows quick sharing of images on social media (just check out my Instagram!) or for sending a quick image to a client for approval or a newspaper for publication. As a very important bonus, the battery system is the same as the previous OM-Ds and PENs; this means that when travelling, one needs one type of charger and one set of batteries. It’s this type of uniformity that endears a brand to the photographer and really helps on assignment. Final Thoughts So, is everything perfect? So far, I have had nothing but praise for this camera; I almost have nothing but praise for this camera. The only thing that bugs me, is the rear function button, labelled Fn1. It’s just too small and flat and is next to a lever which juts out too much, adding to it’s difficult use. In normal function button use, this isn’t an issue and works perfectly well when holding the camera away from the face and accessing the menus, but there are some photographers, myself included, who prefer back button focus, so assign all AF use to the back button. Whilst it’s usable, it’s not comfortable and not as tactile as it should be. So if you’re one of the breed who likes to back button focus, you will be annoyed. However, I like this camera so much that I will try and find a way to attach something to this button to make it stand out a few millimetres.

Dramatic Clouds At Sunset, London. February 05, 2015. Photo: © Edmond Terakopian

Dramatic Clouds At Sunset, London. February 05, 2015. Photo: © Edmond Terakopian

Well, as I mentioned at the beginning, I don’t want to return this test camera back to Olympus; I like it that much. One thing is for sure, a couple of E-M5 Mark II cameras will definitely be joining my bag as soon as they are available. My E-M1 cameras are extremely capable (and will be even better with the new firmware bring faster continuous AF, I’m sure) but for video, the E-M5 Mark II has raised the bar tremendously. For me, it’s a must have camera…..so yes, the sequel is much better! Links: Here’s my Flickr Album with E-M5 MarkII images; this will be updated, so do keep an eye on it.

Addendum

My black Olympus OM-D E-M5 Mark II camera and M.Zuiko 17mm f1.8 lens. April 29, 2015. Photo: Edmond Terakopian

My black Olympus OM-D E-M5 Mark II camera and M.Zuiko 17mm f1.8 lens. April 29, 2015. Photo: Edmond Terakopian

A few months on and I’ve got myself a pair of E-M5 Mark II cameras. As I’ve already mentioned, it’s a great camera. In fact, I have an assignment tomorrow and I’ll only be shooting on these; shall leave the E-M1 cameras at home. One thing however has changed since my review; the back “Function 1” button. Olympus have clearly been listening to the feedback and seem to have completely changed the button’s mechanics. It’s no longer hard to press and feels much better. The design isn’t ideal as the lever juts out too much, but with the button being softer to the touch and with much more feel, back button focusing is actually achievable comfortably. I’ve set up both my cameras with back button focus enabled. Top marks to Olympus for making this small yet significant change since the sample camera I had for my initial review.

Wacom Intuos Pro Tablet Review

Wacom Intuos 5 Touch Medium TABLET (now called the Intuos Pro)

To Tablet Or Not To Tablet; Long Term Review

The Wacom Intuos Pro family of tablets. Photo: ©Wacom

The Wacom Intuos Pro family of tablets. Photo: ©Wacom

I’ve been a user of Wacom tablets for many years now. I have had an Intuos 2 and Intuos 3. With the introduction of a “touch” surface, I was intrigues so borrowed the new Intuos 5 Touch Medium with wireless adapter for a long term review from Wacom.

Editing "1 Sixpence 1 Play" using FCP X and a Wacom Intuos 5 Touch graphic's tablet and calibrated Eizo CG276 monitors. Still frame from video; ©Edmond Terakopian

Editing “1 Sixpence 1 Play” using FCP X and a Wacom Intuos 5 Touch graphic’s tablet and calibrated Eizo CG276 monitors. Still frame from video; ©Edmond Terakopian

The review didn’t start off too well though. The early software drivers on the Mac weren’t very stable and regardless of wether I was in tethered mode (USB) or wireless (using a wireless USB adapter), the tablet would at some stage during the working day disappear and eventually I just gave up and went back to using the Apple Trackpad on my Mac Pro and Intuos 3, waiting for updates to the software.

The Wacom Intuos Pro small tablet. Photo: ©Wacom

The Wacom Intuos Pro small tablet. Photo: ©Wacom

During a large edit on a big project (around a year ago), I developed a serious wrist pain and decided it was time to get the Wacom Intuos 5 out again. My only issue with using my Intuos 3 all the time is that I’m now so used to the gesture control in the Mac OS that having only a pen or the Wacom mouse is often counter productive. I decided to have a look at the Intuos 5 again and thankfully there was updated software. I updated and switched off the Apple Trackpad and went to the Wacom. Glad to report that the drivers are now solid and there are no more problems.

The Wacom Intuos Pro medium tablet. Photo: ©Wacom

The Wacom Intuos Pro medium tablet. Photo: ©Wacom

The huge positive thing about the Intuos 5 is the fact that it is also a touch pad with gesture control too; the name is kind of a clue here. Some learning is needed to master a few new movements but the system works well; so well that I’ve stuck with it solidly since, without issue. My beloved Apple Trackpad has been tucked away in a cupboard since. There’s also fully customisable control in the way of “ExpressKeys” and added control with the Touch Ring.

Having used it with Aperture, Lightroom, Capture One, Photoshop as well as FCP X on some major projects, several of which have gone on to win awards, the combination of pen and touch not only works extremely well, but is also much kinder physically and doesn’t cause the fatigue or pain that can be associated with heavy mouse or trackpad use. For my general computing, I just use the tablet as a touch device.

The Wacom Intuos Pro medium tablet. Photo: ©Wacom

The Wacom Intuos Pro medium tablet. Photo: ©Wacom

One huge advantage with the pen is also the ability to be much more accurate. Using brushes or moving sliders incrementally can be done with pinpoint accuracy. On top of this, the free flowing pen is suited towards artistic expression, so things like burning in or dodging is a breeze and more akin to the expressiveness one would show in a traditional darkroom. Naturally for the artist, there is no better tool, so if you draw, paint or do graphical design and for some reason haven’t tried a Wacom, just do – you won’t regret it. One thing I can pretty much guarantee is that within weeks of use of a Wacom, you will wonder how you managed without it.

The only gripe I have is the touch surface doesn’t cover the entire tablet and is within a designated area, which is incidentally, clearly marked and roughly around 85% of the surface area. I occasionally find myself just outside the bottom of the area and it’s frustrating as it can lead to errors when using the tablet as a trackpad. One does get used to it, and there are so many positives, that for me, it’s not a deal breaker. I do hope though that Wacom can make the next model touch capable over the entire surface.

Some thoughts on which size; as I use dual monitors at my office, I have always opted for the A4 size in the past, now called the Medium. The larger surface area allows for great control and accuracy when working on small areas (like retouching dust). I think anyone who works on a single screen or works just on a laptop will probably find the Small size to be more than capable. As always though, the best thing is to find your nearest stockist and go and have a try to see what suits you best. Also, for those who have never tried a tablet before, at first it will feel slightly alien the first day; trust me, just persevere as it will revolutionise the way you interact with your computer.

Faster working, pain free use, accurate and versatile with both pen and touch. With the maturing of the software, this is a must have for anyone who spends a lot of time photo, video or audio editing. I can’t recommend this highly enough; your work will improve and your wrist will thank you. Having just sold my Intuos 3 tablet, pen and mouse, I shall be purchasing my own Intuos 5 Touch Medium soon!

The Wacom Intuos 5 family of tablets. As you can see, the new Pro series look almost identical. Photo: ©Wacom

The Wacom Intuos 5 family of tablets. As you can see, the new Pro series look almost identical. Photo: ©Wacom

NB – Since beginning this long term review, the model naming has changed and the Intuos 5 range is now called the Intuos Pro. As far as differences between the unit, they are practically identical with some minor cosmetic differences and a slightly different surface coating. Also, the Pro now comes with the wireless kit as standard (although you can also use a USB connection instead).

On a related issue, as I’m often on the road with my MacBook Pro or 11” MacBook Air, either on assignment, teaching workshops or giving presentations, I decided to get a smaller tablet for mobile use. I opted for the Intuos Pen and Touch in the small size, which is working out well too. Not up to the feel of the Intuos 5, which is a professional grade piece of equipment, but it does work well on the road. One thing’s for sure though; once funds allow, I’ll almost definitely be upgrading that to the small size Intuos Pro Touch.

The Wacom Intuos small tablet. Photo: ©Wacom

The Wacom Intuos small tablet. Photo: ©Wacom

To see the Wacom in action, you can jump to 05:28 where you can see it being used with FCP X to edit our film “1 Sixpence 1 Play“: